How to Turn On Heat in Jeep Grand Cherokee?

Cold mornings and chilly drives demand quick, reliable warmth. Your Jeep Grand Cherokee’s climate system delivers comfort through straightforward controls—once you know where they are and how they work. This guide walks through turning on heat across model years, from basic activation to advanced features.
Understanding Your Jeep Grand Cherokee’s Heating System
Your Grand Cherokee circulates warmth through four primary components working in sequence. The heater core acts as a miniature radiator inside your dashboard, transferring heat from engine coolant to cabin air. Hot coolant flows from the engine block through hoses into this heat exchanger.
The blower motor powers a fan that pushes air across the heated core. Without this fan, warm air stays trapped in the dashboard. The motor offers variable speeds—from gentle circulation to maximum output—controlled by a resistor that adjusts electrical flow.
Your thermostat regulates engine operating temperature, ensuring coolant reaches optimal heat levels before circulation begins. A malfunctioning thermostat prevents the engine from warming properly, leaving you with cold air regardless of climate settings.
Temperature controls let you select the desired cabin warmth. Older Grand Cherokees (1999-2004) use rotary dials and switches. Modern models (2011-present) integrate touchscreen interfaces with physical backup buttons, offering dual-zone precision where driver and passenger set independent temperatures.
Pre-Operation Checklist Before Turning On Heat
Check your coolant reservoir before demanding heat from the system. Pop the hood and locate the translucent plastic tank—typically near the radiator with MIN/MAX markings. Low coolant prevents adequate heat transfer and risks engine damage. Top off with the manufacturer-recommended 50/50 antifreeze mixture if levels fall below the minimum line.
Start your engine and allow three to five minutes for warm-up. The heating system relies on hot engine coolant. Demanding maximum heat immediately forces the blower to push cold air until the engine reaches operating temperature. For faster results, avoid revving the engine—modern fuel injection warms efficiently at idle.
Verify your climate control isn’t stuck in OFF mode from your last drive. Some Grand Cherokees remember the previous setting, leaving you without airflow until you reactivate the system. A glance at the dashboard display confirms system status before you start adjusting temperatures.
Step-by-Step: Turning On Heat (2011-2026 Models)
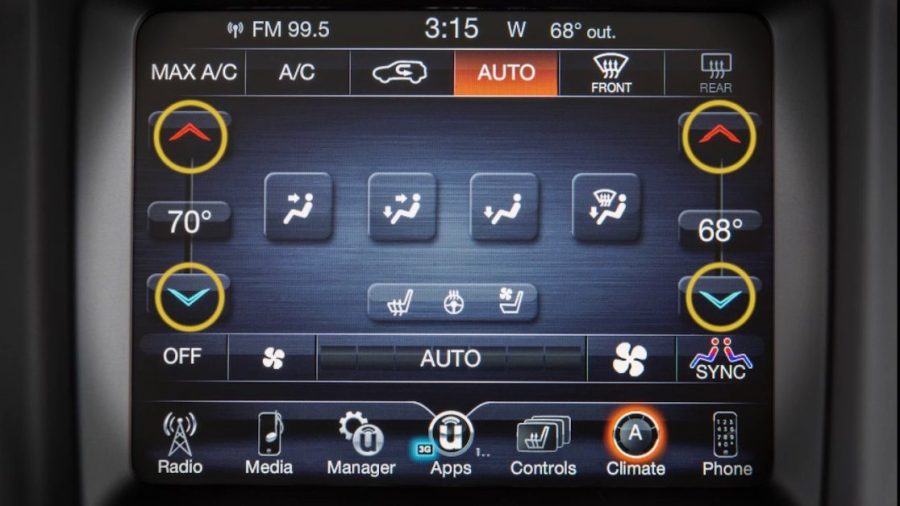
Locate the climate controls below your radio and infotainment screen. You’ll find physical buttons flanking a central display, with temperature adjustment arrows on both sides for dual-zone models. The touchscreen mirrors these controls with larger, touch-friendly buttons.
Press the AUTO button on either the faceplate or touchscreen. This activates automatic climate control, letting the system manage fan speed, air distribution, and temperature. The AUTO indicator illuminates on your display, confirming the system has taken control.
Adjust temperature using the up arrow (red) to increase warmth or the down arrow (blue) to reduce it. Each press changes the setting by one degree. For rapid adjustment on touchscreen models, press and slide the temperature bar toward red for heat. The display shows your target temperature—typically 72°F serves as a comfortable baseline, but personal preference varies from 68°F to 78°F.
Watch the fan speed increase automatically as the system works toward your set temperature. If you prefer manual control, rotate the fan speed dial clockwise or tap the fan increase button on the touchscreen. Seven speed settings let you balance warmth delivery with noise levels.
Select air distribution by pressing the mode button until your desired setting appears. Panel outlets direct air at face level. Floor mode concentrates warmth at your feet—ideal for cold weather. Mix mode combines both, with additional flow to defrost vents. For maximum warmth distribution, choose the floor/defrost combination that pushes heat down while keeping windows clear.
Turn off the A/C button if it’s illuminated. Air conditioning dehumidifies air even in heating mode, which helps prevent windshield fog but reduces overall warmth. On dry, cold days, disabling A/C maximizes heat output. The system may automatically activate A/C in certain modes—manually override by pressing the A/C button until the indicator turns off.
Using Automatic Climate Control Features
Automatic mode continuously adjusts to maintain your selected temperature regardless of external conditions. When outside temperatures drop, the system increases fan speed and redirects more air to floor vents. As the cabin warms, it reduces fan intensity and shifts airflow to panel vents for even distribution.
The system monitors cabin temperature through infrared sensors mounted in the control panel face. These sensors measure surface temperature of occupants and interior surfaces—not just air temperature—providing more accurate comfort control than traditional thermostats. This explains why AUTO mode sometimes increases fan speed when you feel warm enough; it’s compensating for cold surface temperatures that will eventually chill you.
Dual-zone control allows the driver and passenger to set different temperatures. Press the temperature arrows on each side independently. The right side controls passenger temperature, the left controls driver temperature. You can create a 10-degree difference between zones—72°F on the driver side and 82°F for a cold passenger, for example.
Use the SYNC button to match both zones instantly to the driver’s settings. Located on the touchscreen climate menu or as a physical button below the display, SYNC eliminates the need to adjust each side separately when you want uniform temperature. Press SYNC again to disable synchronization and return to independent control.
MAX DEFROST prioritizes windshield clearing over cabin comfort. Press the windshield icon with maximum fan lines to activate. This mode directs all airflow to the windshield and side window vents at full fan speed with A/C automatically enabled. Heat output remains high, but you’ll notice reduced warmth at panel and floor vents until you deactivate MAX DEFROST.
Manual vs Automatic Mode: Which to Choose
Automatic mode suits most driving conditions. It maintains consistent comfort while you focus on the road, adjusting fan speed and temperature without input. You set your desired warmth level once, and the system handles the rest. This mode prevents the common mistake of cranking the heat to maximum and then getting too warm.
Choose manual mode when you want specific airflow patterns or fan speeds. Press any mode button, adjust fan speed manually, or select specific vent configurations to exit AUTO mode. The AUTO indicator turns off, signaling you’ve taken control. Manual mode gives you precision for scenarios like directing maximum heat to frozen feet while keeping upper vents closed.
Manual operation works better during warm-up periods when you want minimal fan speed until the engine generates adequate heat. Set the temperature high but keep fan speed low (two or three bars) to avoid blowing cold air during the first few minutes. Once you feel warmth at the vents, increase fan speed manually or return to AUTO mode.
For quick heat bursts, manual mode with maximum fan and floor distribution delivers results faster than AUTO’s measured approach. This strategy works after prolonged exposure to extreme cold when you need immediate warmth rather than gradual temperature equilibrium.
Adjusting Temperature Zones and Fan Speed
The temperature ranges from 60°F to 90°F in most Grand Cherokee models. The lowest setting may display “LO” instead of a specific number—this runs the system at maximum cooling capacity. The highest setting shows “HI,” running continuous maximum heat. For actual temperature control rather than extremes, stay within the 65°F to 80°F range.
Fan speed adjusts via the rotary knob or touchscreen buttons. Seven discrete speeds progress from whisper-quiet circulation to powerful maximum output. Lower speeds (1-3) provide subtle warmth with minimal noise, suitable for highway driving when you want conversation-friendly cabin sound. Middle speeds (4-5) balance airflow and noise for typical driving. High speeds (6-7) push maximum heat volume when fighting severe cold.
The recirculation button toggles between outside air and recirculated cabin air. Fresh air mode pulls from outside, which can be cold during winter. Recirculation mode reuses warmed cabin air, heating faster and maintaining temperature with less energy. The trade-off: prolonged recirculation leads to window fogging and stale air. Use recirculation initially for rapid warm-up, then switch to fresh air mode after 10-15 minutes.
Air distribution modes determine where warmth flows. Panel mode directs air from dashboard vents at face level—effective for defrosting yourself but misses the lower body. Floor mode concentrates at foot level where cold settles. Bi-level splits between panel and floor with slight defrost contribution, offering whole-body comfort. Floor/defrost combines lower warmth with windshield clearing, ideal for snowy conditions. Defrost alone pushes everything to the windshield vents.
Advanced Heating Features (Heated Seats, Steering Wheel)
Heated seats add supplemental warmth independent of the air system. Locate the seat heating buttons on the center console—they display a seat icon with rising heat lines. Press once for high heat, twice for medium, three times for low, and a fourth press turns it off. Each press cycles through these levels, with LED indicators showing current intensity.
High setting delivers maximum warmth in roughly two minutes, ideal for immediate cold relief. Medium provides sustained comfort without overheating during longer drives. Low maintains gentle warmth for temperature maintenance once you’ve reached comfort. Heated seats work regardless of climate system operation—use them even before the engine warms up.
Front and rear heated seats operate independently through separate buttons. The driver and passenger front seats each have dedicated controls. On models equipped with rear heated seats, controls appear on the rear center console or are accessible through the rear climate control panel.
Heated steering wheels activate through the center console button marked with a steering wheel icon and heat waves. One press turns it on to maximum heat; a second press turns it off. Unlike seats with multiple levels, steering wheel heat operates at a single intensity. The system typically reaches comfortable warmth within 90 seconds.
Some Grand Cherokee models feature automatic heated seats and steering wheel activation with remote start. When ambient temperature falls below 40°F, remote starting the vehicle automatically activates driver’s heated seat and steering wheel. Above 80°F, the system activates ventilated seats instead. Enable this feature in the Uconnect settings menu under “Remote Start Comfort Systems.”
Troubleshooting Common Heating Issues
Weak or absent heat despite proper control settings indicates coolant system problems. Low coolant prevents adequate flow through the heater core. Check the reservoir—if empty, you likely have a leak requiring immediate attention. Refill and monitor levels over several days. Persistent drops demand a professional diagnosis to locate leaks in hoses, the radiator, or the water pump.
A thermostat stuck open prevents the engine from reaching proper operating temperature. You’ll notice lukewarm air even after extended driving, and the temperature gauge reads lower than normal. Thermostat replacement typically costs $150-$300 at a shop, or $30-$50 if you’re comfortable with DIY repairs.
Clogged heater cores restrict hot coolant flow, reducing heat output. This develops gradually as corrosion and sediment accumulate inside the core’s narrow passages. You might notice a slight coolant smell through the vents or fogging on the windshield from coolant vapor. Flushing sometimes restores function, but severe blockages require heater core replacement—a dashboard removal job best left to professionals.
Weak airflow with functioning control points to blower motor or cabin air filter issues. A failing blower motor produces unusual noises—squealing, grinding, or intermittent operation. The motor either works or doesn’t; there’s no gradual failure pattern. Replacement costs $150-$400, depending on model year and labor rates.
Cabin air filters trap dust, pollen, and debris before air enters the cabin. Severely clogged filters restrict airflow, making the system work harder with reduced output. Replace the cabin filter every 15,000-20,000 miles or annually. The filter lives behind the glove box on most Grand Cherokees—a five-minute DIY replacement requiring no tools.
Climate control display malfunctions or unresponsive controls sometimes resolve through a system reset. With the vehicle running, simultaneously press and hold the “Browse/Enter” and “Volume” buttons on your steering wheel for 10 seconds. The Uconnect system reboots, clearing software glitches affecting climate control. If issues persist after a reset, you may face deeper electrical problems requiring diagnostic scanning.
Blend doors control air temperature by mixing hot and cold air before it enters the cabin. Electric actuators move these doors to the commanded positions. Failed actuators cause clicking sounds from behind the dashboard and an inability to change the temperature despite control inputs. The system might blow only hot or only cold air, regardless of settings. Actuator replacement involves dashboard disassembly, costing $300-$600 at repair shops.