How to Paint Jeep Wrangler Fender Flares: Essential Techniques for a Flawless Finish
Are you a proud owner of a Jeep Wrangler?
One of the best ways to give your Wrangler a fresh and customized look is by painting the fender flares.
But how do you go about it?
In this short guide, we will walk you through the steps to paint your Jeep Wrangler fender flares and provide you with some helpful tips along the way.
So, if you’re ready to add some flair to your fender flares, let’s dive in!
how to paint jeep wrangler fender flares
To paint Jeep Wrangler fender flares, follow these steps:
1.
Clean the flares using a quality degreaser.
2.
Wipe down the flares with a tack rag to remove dust.
3.
Sand the surface with 200 grit sandpaper to remove imperfections.
4.
Treat the flares with an adhesion promoter.
5.
Lightly sand the surface with a 2000 grit scotch brite pad.
6.
Apply 1 coat of polypropylene primer, adding a second coat if necessary.
7.
Apply two or three thin, even coats of paint to avoid runs.
8.
Allow each coat to dry before applying the next one.
9.
Apply 1-2 coats of clear coat for added protection.
10.
Let the fender flares dry for 24 hours for complete hardening of the paint.
11.
When repainting, lightly sand the surface, prime it, and then apply new paint.
Remember not to use lacquer thinner or reducer, use the correct paint code for your Jeep, and consider using a flex additive in the color coat to prevent cracking.
Also, tighten the screws once the paint is dry.
Key Points:
- Clean the flares using a degreaser
- Wipe down the flares with a tack rag to remove dust
- Sand the surface with 200 grit sandpaper to remove imperfections
- Treat the flares with an adhesion promoter
- Apply 1 coat of polypropylene primer, adding a second coat if necessary
- Apply two or three thin, even coats of paint, allowing each coat to dry before applying the next one.
Check this out:
💡 Did You Know?
1. Did you know that Jeep Wrangler fender flares are made of a material called thermoplastic olefin (TPO)? This durable and flexible material is resistant to fading and cracking, making it perfect for withstanding the elements and off-road adventures.
2. The Jeep Wrangler’s fender flares are not just for aesthetic purposes; they also serve as protective barriers for the vehicle. By extending the width of the fenders, they shield the body and tires from mud, rocks, and debris, reducing the risk of damage during off-roading.
3. When painting Jeep Wrangler fender flares, it’s important to use a high-quality automotive paint specifically designed for plastic parts. These paints contain special additives that promote adhesion and flexibility, ensuring a long-lasting and professional finish.
4. Unlike most car parts, Jeep Wrangler fender flares are generally installed using plastic clips or screws rather than welding or other forms of permanent attachment. This makes it relatively easier to remove them for paint touch-ups or modifications.
5. Jeep Wrangler fender flares come in various styles and sizes, allowing owners to personalize their vehicle’s appearance and functionality. From flat-style flares that provide a more rugged and aggressive look to larger flares that accommodate oversized tires, there’s a wide range of options to suit different preferences and needs.
Cleaning And Prepping The Flares
To achieve a flawless paint job on your Jeep Wrangler fender flares, it is crucial to start with a clean surface. Here are the steps to follow:
Begin by using a high-quality degreaser to thoroughly clean the outer surface of the flares. This will remove any dirt, grease, or grime that may hinder the adhesion of the paint.
After cleaning, use a tack rag to wipe down the flares and remove any lingering dust particles. This step ensures that the surface is free from any loose debris that could affect the smoothness of the paint application.
Inspect the flares for any imperfections or damage. If necessary, address these issues before proceeding with the paint job.
Mask off any areas that you do not want to be painted using painter’s tape. This will help ensure clean edges and a professional finish.
Choose a high-quality paint specifically designed for automotive applications. Follow the manufacturer’s instructions for mixing, application, and drying times.
Apply the paint using a smooth and even motion. Start with a thin layer, allowing it to dry before applying additional coats. This will help achieve a more uniform and durable finish.
Once the paint has dried completely, remove the painter’s tape carefully to reveal sharp edges and clean lines.
Remember to take your time and work in a well-ventilated area to ensure a successful paint job. Happy painting!
- Clean the flares with a high-quality degreaser
- Use a tack rag to remove dust particles
- Inspect for imperfections or damage
- Mask off areas that shouldn’t be painted
- Choose a high-quality automotive paint
- Apply thin coats, allowing them to dry between layers
- Remove painter’s tape carefully after drying.
Sanding And Promoting Adhesion
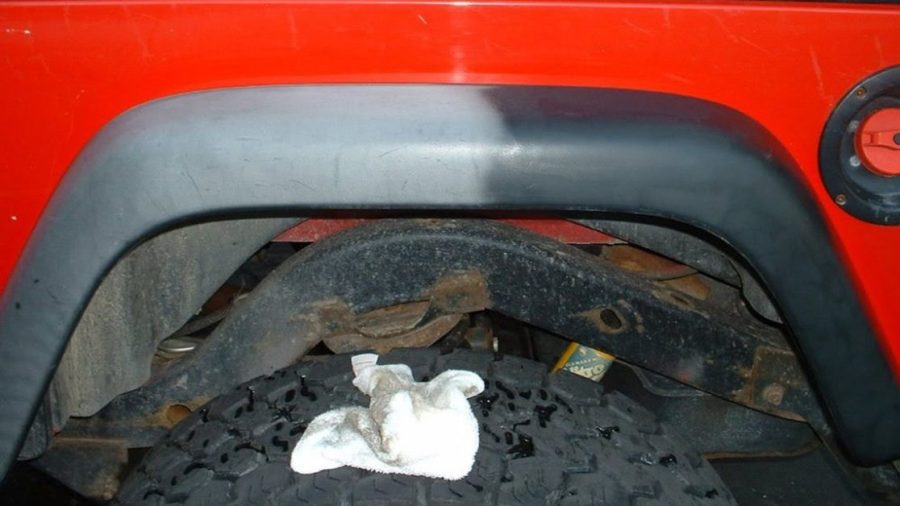
Next, sanding the surface of the fender flares using 200 grit sandpaper is crucial. This step removes imperfections and previous paint layers, providing a smooth surface for the new paint to adhere to. It is important to sand in a circular motion and cover the entire surface of the flares.
After sanding, treating the surface of the flares with an adhesion promoter is essential. This product establishes a strong bond between the paint and the flares, ensuring long-lasting durability. Make sure to follow the manufacturer’s instructions for the specific adhesion promoter you are using.
For the final sanding step, lightly sand the surface with a 2000 grit scotch brite pad. This step creates a smoother texture and enhances the paint’s ability to adhere to the flares.
Applying Primer To The Flares
Now that your fender flares are clean and prepped, it’s time to apply the primer. Begin by applying one coat of polypropylene primer evenly to the flares. Make sure to cover the entire surface and apply a second coat if necessary, ensuring an even and consistent coverage.
Primer acts as a base for the paint, enhancing its adhesion and providing a smooth foundation for the color coat.
Allow the primer to dry according to the manufacturer’s instructions before moving on to the next step.
- Apply one coat of polypropylene primer evenly
- Ensure complete coverage
- Apply second coat if necessary
- Follow manufacturer’s instructions for drying time
Applying The Base Coat Of Paint
Once the primer is dry, it’s time to apply the base coat of paint. Start by selecting the proper paint color for your Jeep Wrangler using the paint code. This code can be found on a sticker in the driver’s side door jam, from auto shops, car dealerships, the owner’s manual, or the vehicle manufacturer’s website.
Apply two or three thin, even coats of paint to the fender flares. It is essential to apply the paint in slow and overlapping strokes to achieve a consistent finish and avoid runs. Allow each coat to dry completely before applying the next one.
To prevent cracking, consider using a flex additive in the color coat. This will provide flexibility to the paint, making it more resistant to chipping or peeling when the fender flares are exposed to road debris or rough terrain.
Adding Clear Coat For Protection
To ensure the protection and glossy finish of paint, it is highly recommended to apply 1-2 coats of clear coat. This serves as a protective layer against damaging elements such as UV rays, dirt, and other environmental factors.
When applying the clear coat, it is important to follow the same approach as with the base coat. Apply thin and even coats, allowing each coat to dry before moving on to the next one. This will help to avoid any potential issues with runs or unevenness, which can negatively impact the overall appearance of the fender flares.
To summarize, here are the key points to remember:
- Clear coat adds a glossy finish and protects the paint.
- Apply 1-2 coats for optimal protection.
- Apply the clear coat in thin and even coats.
- Allow each coat to dry before applying the next one.
- Watch out for runs or unevenness that can affect the appearance.
“To protect the paint and add a glossy finish, it is recommended to apply 1-2 coats of clear coat.”
Allowing The Paint To Dry And Harden
After completing the painting process, it is crucial to let the fender flares dry for a minimum of 24 hours. This drying period allows the paint to fully cure and harden. Avoid rushing this step to ensure a durable and long-lasting finish.
During the drying process, it is essential to handle the painted fender flares with care to avoid any accidental damage or smudging. Once completely dry and hardened, the flares can be reinstalled on the Jeep Wrangler.
Tips For A Successful Paint Job
- Avoid using lacquer thinner or reducer, as they can repel the paint and affect the finish.
- Tighten any screws or fasteners on the fender flares only after the paint has fully dried.
- If you are repainting the fender flares, lightly sand the surface and treat it with a primer before proceeding with the paint application.
- Always use the correct paint color for your Jeep Wrangler by referring to the paint code.
Consider watching a painting process video to gain a visual understanding of the steps involved and techniques used.
Using lacquer thinner or reducer can repel the paint and damage the finish.
- Make sure to tighten any screws or fasteners on the fender flares once the paint has dried.
- Prior to applying the paint, lightly sand the surface of the fender flares and apply a primer for better adhesion.
- Refer to the paint code to ensure you are using the correct color for your Jeep Wrangler.
- Gain a better understanding of the painting process and techniques by watching a video tutorial.
Additional Resources And Support
If you need help with painting your Jeep Wrangler fender flares, there are several resources you can turn to:
- Online videos: Watch step-by-step instructions and visual demonstrations of the painting process.
- Auto shops and car dealerships: Consult professionals who can provide guidance and advice specific to your Jeep Wrangler model.
- Owner’s manual: Refer to the manual for information and support regarding painting requirements.
- Vehicle manufacturer’s website: Visit the website for additional tips and guidelines on achieving the best paint job for your fender flares.
Always remember to follow the manufacturer’s instructions and recommended techniques to ensure a successful outcome.
- Bullet points can be used to summarize the resources available for assistance on painting Jeep Wrangler fender flares.
- A blockquote can be used to highlight an important tip or advice regarding the paint job.
FAQ
Can Jeep Wrangler fender flares be painted?
Yes, Jeep Wrangler fender flares can be painted. From the information provided, the fender flares have been sanded and prepped for painting. Removing them for painting would ensure a clean and even application. It seems like the original flares were cut by the previous owner, making the decision to paint them a good way to refresh the appearance and potentially customize the Jeep Wrangler.
Can I paint my own fender flares?
Yes, you can paint your own fender flares. Firstly, make sure you spray primer onto the surface of the flares, ensuring even coverage. Apply multiple coats of primer if necessary, both on the exterior and interior of the flares if they have been detached. It is important to work in a well-ventilated area and wear a respirator when using spray paint for your safety. Once the primer is dry, you can proceed to paint the fender flares in your desired color using spray paint, following the same precautions. With proper preparation and careful application, you can achieve a professional-looking finish on your fender flares.
Are fender flares paintable?
Yes, fender flares are paintable, providing you with the option to have them custom painted to match your vehicle’s color or to create a unique look. This allows you to personalize your vehicle and give it a customized appearance. Additionally, the ease of installation makes it convenient to install the flares yourself in your own garage, saving time and money that would otherwise be spent at a professional shop.
How do you prep plastic fender flares for paint?
To properly prepare plastic fender flares for painting, begin by sanding the surface with 200 grit sandpaper. This will help to smooth out any imperfections and create a rough surface for the primer to adhere to. Once the sanding is complete, it is important to thoroughly clean the flare by wiping it with a tack cloth to remove any dust or debris. This step ensures a clean surface for the paint to bond with, resulting in a smooth and even finish.