How to Replace a Jeep Renegade Daytime Running Light (DRL): 5-Minute DIY Guide

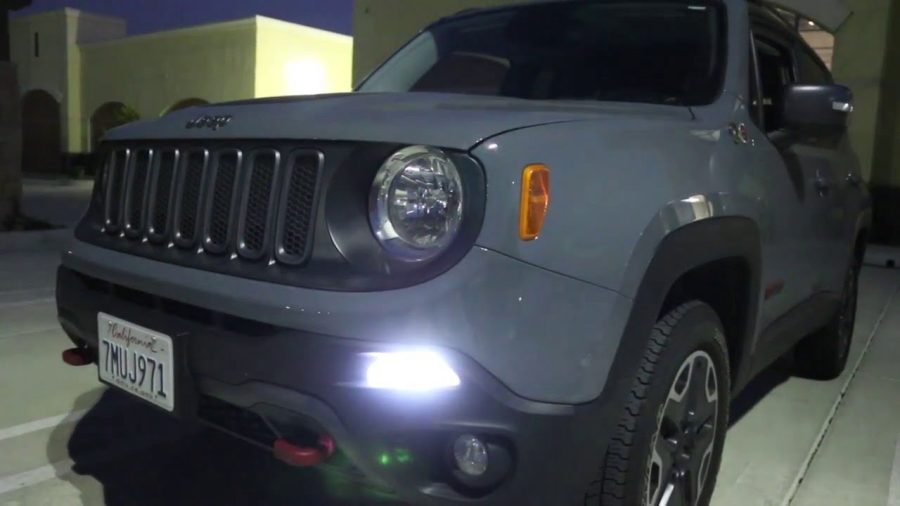
Replacing a Jeep Renegade daytime running light (DRL) is a straightforward 5-minute DIY task. You only need a Phillips screwdriver and a replacement 7528 bulb. Many owners default to costly dealership visits for this simple bulb swap. This guide eliminates that unnecessary expense.
No special tools or mechanical knowledge required. Your Renegade’s DRL system is designed for easy maintenance access. The entire process involves removing just two screws and rotating a bulb socket. Most first-time repairs take under 10 minutes, including reassembly.
This comprehensive guide covers the step-by-step process, required tools, bulb options, and common mistakes. You’ll also learn troubleshooting techniques for challenging scenarios. Save $60-$135 compared to dealership labor costs.
Tools and Materials You’ll Need
Essential Tools and Parts
A standard Phillips screwdriver handles the job perfectly. A stubby-head Phillips screwdriver works even better in tight spaces. You’ll avoid scraping against the tire sidewall.
The replacement bulb is a Sylvania 7528 or equivalent. LED alternatives like the ZEVO LED 7528 offer a longer lifespan. Standard halogen bulbs cost $8-$15. LED upgrades range from $20 to $30.
Optional Supplies
Dielectric grease protects electrical contacts from corrosion. This $5 addition extends bulb life significantly. Small magnetic parts tray keeps screws organized during removal.
Bulb Type & Compatibility
The 7528 designation ensures proper fit and electrical compatibility. Never substitute standard headlight bulbs or different miniature bulb sizes. Cross-reference your owner’s manual if uncertain about model year variations.
Total cost estimate: $15-$35, including bulb and optional supplies. Compare this to dealership charges of $90-$165 for the same repair.
How to Confirm Your DRL Is Actually Out
Visual inspection reveals the most obvious clues. One DRL appears noticeably dimmer or completely dark. Compare the left and right sides during daylight operation.
DRL vs. Turn Signal: Key Differences
DRL bulbs typically sit in black or dark gray housings. Turn signals use white or amber-colored housings. The DRL is positioned inward (closer to the vehicle center). Turn signals mount toward the outer edge.
Turn on your DRLs in daylight to confirm the fault. One side should illuminate normally while the failed side remains dark. Flickering indicates electrical problems rather than bulb failure.
Rule out intermittent electrical issues before purchasing replacement parts. Persistent flickering or random operation suggests wiring faults. Simple bulb failure shows consistent darkness on one side only.
Seek professional electrical diagnosis if both DRLs fail simultaneously. This pattern rarely indicates dual bulb failure.
Preparation: Safety & Access
Park on level ground with the engine off. Allow headlights to cool if recently operated. Turn the steering wheel away from your working side.
This wheel positioning creates crucial access space. Left DRL repair requires turning the wheels fully right. Right DRL repair needs wheels turned fully left. Maximum turning provides optimal working room.
Gather your tools within easy reach. Consider safety glasses for under-fender work. Debris occasionally falls during panel removal.
Step 1: Access the Headlight Assembly
Key Action: Remove two Phillips screws securing the headlight access panel.
Expected Outcome: Panel separates cleanly, revealing bulb socket area.
Locate the access panel near your wheel well. Two Phillips screws secure this plastic panel to the headlight assembly. Screws position along the inner edge closest to the vehicle center.
Use your Phillips screwdriver to turn counterclockwise. Screws typically remove easily without excessive force. A stubby-head screwdriver prevents tire contact during removal.
Common Mistake: Using a full-length screwdriver creates tire interference. Forcing stuck screws risks stripping screw heads.
Set removed screws in your magnetic tray immediately. Lost screws under the vehicle create unnecessary complications. Handle the plastic panel gently to avoid breaking mounting tabs.
The panel pivots outward and downward once the screws release. Some resistance is normal due to weather sealing. Pull steadily rather than jerking the panel free.
Step 2: Identify and Locate the DRL Bulb
Key Action: Find the correct bulb socket inside the headlight assembly.
Expected Outcome: Clear identification of DRL versus turn signal bulb locations.
Two bulb sockets become visible after panel removal. The inner bulb socket (closer to the vehicle center) houses the DRL. The outer socket (toward vehicle edge) contains the turn signal bulb.
Housing colors provide additional identification clues. DRL sockets typically feature black or dark housings. Turn signal sockets use lighter colored housings for heat reflection.
Common Mistake: Accidentally targeting the turn signal instead of the DRL bulb.
Note any alignment tabs or orientation markers before removal. These plastic guides ensure proper bulb installation. Some model years include small arrows indicating rotation direction.
Inspect the area for obvious damage or corrosion. Clean debris from socket openings if present. This preparation prevents contamination during bulb installation.
Step 3: Remove the Old DRL Bulb
Key Action: Rotate the bulb socket counterclockwise and withdraw it.
Expected Outcome: Socket and old bulb separate from the headlight assembly.
Grasp the bulb socket firmly, not the bulb itself. Apply gentle pressure while turning clockwise approximately 90 degrees. Rotation stops when the socket releases from its locked position.
Common Mistake: Excessive force or wrong rotation direction damages the socket threads.
Pull the socket straight toward you after rotation completes. Avoid twisting or angling during withdrawal. The old bulb may remain attached to the socket or fall free.
Examine the socket interior for corrosion or debris buildup. White or green deposits indicate moisture intrusion. Clean with electrical contact cleaner if contamination appears.
Set the old bulb aside for comparison with your replacement. Verify identical part numbers before proceeding. Socket damage requires professional repair rather than simple bulb replacement.
Step 4: Install the New DRL Bulb
Key Action: Insert the new 7528 bulb and rotate to secure position.
Expected Outcome: Bulb locks securely with proper electrical contact.
Remove your new bulb from the packaging carefully. Handle only the metal base, avoiding glass contact. Skin oils reduce bulb lifespan significantly.
Common Mistake: Incorrect bulb orientation causes installation failure and potential damage.
Insert the bulb into the socket, aligning the orientation tabs properly. These tabs prevent incorrect installation that could damage electrical contacts. Gentle pressure seats the bulb completely.
Rotate clockwise approximately 90 degrees until locking occurs. Proper installation creates a slight clicking sensation. The bulb should feel secure without excessive tightness.
Test the connection with gentle pulling pressure. Correctly installed bulbs resist removal without rotation. Loose installation indicates incomplete seating or misaligned orientation tabs.
Step 5: Reinstall the Socket and Test
Insert the bulb socket back into the headlight assembly. Align the socket orientation with the housing opening. Push firmly while rotating counterclockwise to engage the locking mechanism.
The socket should seat flush with the housing surface. Protruding sockets indicate incomplete installation. Verify secure mounting before proceeding to panel replacement.
Replace the access panel in reverse order. Position the panel against the headlight assembly, ensuring proper alignment. Thread both Phillips screws by hand initially.
Tighten screws snugly but avoid over-torquing. Plastic threads strip easily under excessive pressure. Hand-tight plus one-quarter turn provides adequate security.
Step 6: Final Testing and Verification
Turn your steering wheel back to the center position. Start the engine and activate the DRL system. Both sides should illuminate with equal brightness.
Walk around the vehicle to compare DRL output. Successful repairs show no brightness difference between sides. Uneven lighting suggests an incomplete socket connection or bulb defects.
Test DRL operation in various lighting conditions. Automatic systems should engage during daylight driving. Manual systems require headlight switch activation.
Document your repair date for maintenance records. Note the bulb manufacturer and part number. This information helps with future replacements and warranty claims.
Troubleshooting: What If It Still Doesn’t Work?
Checking for Installation Errors
Verify correct bulb orientation as the most common failure cause. Remove and reinstall the bulb, ensuring tab alignment. Quarter-turn rotation should complete smoothly without forcing.
Confirm you replaced the DRL rather than the turn signal bulb. Test turn signals separately to verify their continued operation. Accidental turn signal replacement leaves the DRL problem unsolved.
Checking for Electrical Faults
Inspect socket contacts for corrosion or damage. Clean with electrical contact cleaner and wire brush if needed. Apply dielectric grease to prevent future corrosion issues.
Test with a known-good bulb if available. Persistent failure with multiple bulbs indicates electrical system problems. Socket wiring or relay failures require professional diagnosis.
Check your Renegade’s DRL fuse location using the owner’s manual. Blown fuses affect both sides typically. Single-side failures rarely involve fuse problems.
When to Visit a Mechanic
Electrical intermittent faults exceed DIY repair scope. Flickering, random operation, or multiple component failures need professional attention. Wiring harness damage requires specialized tools and knowledge.
Professional diagnosis costs $100-$150 but prevents unnecessary parts purchases. Complex electrical repairs may cost $200-$400, depending on fault location.
Pro Tips & Maintenance
Extending Bulb Life
Apply dielectric grease to the socket contacts after installation. This prevents corrosion and ensures a reliable electrical connection. A thin coating provides adequate protection without excess buildup.
Consider replacing both DRL bulbs simultaneously. Matched bulbs provide even brightness and similar replacement intervals. Bulk purchasing often reduces per-unit costs.
Upgrade Options
LED alternatives like ZEVO 7528 bulbs last 10+ years versus 2-5 years for halogen. Higher upfront costs ($20-$30) provide long-term savings through reduced replacement frequency.
OEM bulbs guarantee perfect compatibility and warranty coverage. Aftermarket alternatives may vary in fit and performance. Research compatibility before purchasing non-OEM options.
Preventive Maintenance
Inspect DRL operation monthly during routine vehicle checks. Early detection prevents safety issues and emergency repairs. Include DRL testing in seasonal maintenance routines.
Store spare 7528 bulbs in your glove box for emergency roadside repairs. Quick replacement maintains vehicle safety and legal compliance. Rural driving especially benefits from backup parts availability.
Clean headlight assemblies during regular washing. Debris buildup restricts cooling airflow and reduces bulb lifespan. Proper maintenance extends the life of all automotive bulbs and components.
Frequently Asked Questions
How often do Jeep Renegade DRLs burn out?
Standard halogen 7528 bulbs last 2-5 years under normal conditions. LED alternatives extend lifespan to 10+ years but cost more initially. Climate and usage patterns affect replacement intervals.
Can I use standard headlight bulbs instead of 7528s?
No. Jeep Renegade DRLs require miniature 7528 bulbs specifically. Wrong bulb sizes create fit and electrical compatibility problems. Always verify part numbers before purchasing.
Do I need to disconnect the battery?
Battery disconnection is unnecessary for DRL replacement. The low-voltage DRL circuit poses minimal safety risks. Simple bulb swaps don’t require an electrical system shutdown.
How much do dealerships charge for DRL replacement?
Dealership labor typically costs $75-$150 plus parts ($15-$30). Total repair bills range $90-$180. DIY replacement costs only $15-$35 for parts.
Why does my DRL flicker instead of staying completely out?
Flickering suggests loose connections or electrical intermittent faults rather than bulb failure. Reseat the bulb socket first. Persistent flickering requires professional electrical diagnosis.
Should I replace both DRL bulbs at once?
Simultaneous replacement ensures matched brightness and eliminates future single-side failures. Bulk purchasing often provides cost savings. Consider this approach for vehicles over 3 years old.
Conclusion
Replacing a Jeep Renegade DRL proves remarkably simple with proper guidance. This 5-minute task saves significant money compared to dealership visits. Basic tool skills and careful attention to detail ensure success.
Test your repair immediately after reassembly. Both DRLs should provide equal brightness and reliable operation. Save this guide for future reference or share it with fellow Renegade owners.
Remember that troubleshooting guidance helps when complications arise. Simple electrical issues often resolve with cleaning and proper reassembly. Professional help remains available for complex electrical faults that exceed DIY capabilities.
Regular maintenance prevents emergency repairs and ensures continued safety. Monthly DRL checks take seconds but provide significant peace of mind. Your Renegade’s lighting system deserves the same attention as other critical components.