How to Remove a Jeep Wrangler 2-Door Back Seat (TJ, JK, JL)

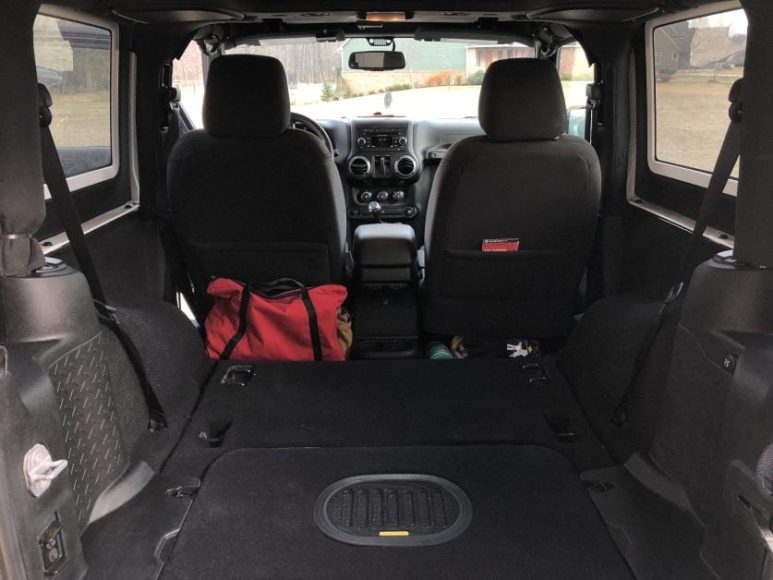
Removing the rear seat from your 2-door Jeep Wrangler is one of the easiest interior modifications you can make. Most owners complete the job in under 10 minutes. Whether you drive a classic TJ, a JK, or a newer JL, the core process is similar — but the details differ enough to matter. This guide covers all three generations in one place, so you know exactly what to expect before you touch a single bracket.
Why Remove the 2-Door Wrangler Back Seat
Space in a 2-door Wrangler is already tight. Removing the rear bench can increase usable cargo length by roughly 30–40%, which changes the game for camping trips, hauling gear, or traveling with large dogs.
Here’s why Wrangler owners pull the rear seat:
- More cargo room for overlanding gear, luggage, coolers, or tools
- Access to floor-mounted D-ring tie-downs hidden under or around the seat base
- Easier interior builds — sound deadening, cargo platforms, and custom storage systems need a bare floor to start
- Roof-top tent prep — pairing a stripped interior with the best Jeep Wrangler roof top tent makes overnight trips simpler
- Dog-friendly hauling without worrying about claws tearing upholstery
You can also pair this mod with a set of the best Jeep Wrangler cargo racks to truly maximize your load capacity. For owners who also run a soft top, a Jeep Wrangler roof rack for soft top stacks even more storage potential on top of the cabin.
Generations at a Glance: TJ vs. JK vs. JL Rear Seats
Before you start pulling levers, know which generation you own. The attachment systems are genuinely different.
| Generation | Years | Attachment Style | Tools Needed? |
|---|---|---|---|
| TJ | 1997–2006 | Two front pins into brackets, rear hooks | None (angling required) |
| JK (2-door) | 2007–2017 | Latch/lever system, bottom hooks | Usually none; some models need 10–18mm socket |
| JL (2-door) | 2018–present | Quick-release lever, rollers | None |
All three generations share the same high-level sequence: fold the seatback forward, release the latch or lever, free the bottom anchors, then lift and angle the seat out. The differences are in the details — specifically, how the front brackets attach and how heavy the seat is.
Seat weight estimates:
- TJ: approximately 70–90 lbs
- JK (2-door): approximately 90–110 lbs
- JL (2-door): approximately 100–120 lbs
Have a second person on hand for JK and JL models. These seats are heavier than they look.
Tools and Prep Before You Start
For most JK and JL owners, no tools are required at all. TJ owners also typically need nothing but their hands. However, if your JK has bolted seat hardware — common on builds using aftermarket cargo systems — you’ll want:
- 10mm, 13mm, or 18mm socket with a short extension
- Ratchet or impact wrench (impact makes it faster, not mandatory)
- Gloves to protect your hands from sharp metal brackets
Prep steps that apply to all generations:
- Turn off the ignition. This is a simple precaution worth doing every time.
- Slide both front seats as far forward as possible. You need room to maneuver the rear seat out.
- If you have a soft top, open the rear window or drop the top. More openings mean easier extraction.
- Clear any cargo, floor mats, or loose items from the rear floor. You’ll be tilting and angling the seat, and obstacles make that harder.
Step-by-Step Removal: General Method for All 2-Door Wranglers
This universal sequence applies to TJ, JK, and JL models. Follow the generation-specific sections below for finer detail.
Step 1: Slide both front seats fully forward. Give yourself maximum rear clearance.
Step 2: Locate the seatback latch. On most Wranglers, it’s a lever or bar on the side or underside of the seatback.
Step 3: Release the seatback latch. The backrest will fold forward onto the seat cushion. Hold it as you do this — don’t let it slam.
Step 4: Find the seat base release. This is usually a lever, latch, or hook mechanism at the front or underside of the cushion base.
Step 5: Release the base and allow the seat frame to tilt or shift. Don’t try to pull it straight backward. Every generation requires some degree of angling.
Step 6: Free the bottom anchors. Lift, pivot, and work the seat toward the rear opening.
Step 7: With a helper, carry the seat out through the open tailgate or rear. Set it on a blanket or padded surface to avoid scratching the upholstery.
Expect mild resistance from metal pins and brackets. Don’t force anything. If the seat feels stuck, check that all latches are fully released before trying again.
Removing the Rear Seat: TJ-Specific Steps
The TJ rear seat uses a two-pin system at the front brackets and hooks at the rear. The seat must be angled — it will not lift straight out.
- Push the release lever upward on the side of the seatback to disengage the reclining latch.
- Fold the seatback fully forward onto the cushion.
- Grab the loop handles on the inside of the seat frame (visible on most TJs once the back is down).
- Tilt the seat sideways — toward the driver’s side first if you’re working alone — to unseat the first front pin from its bracket.
- Angle the seat further until the second pin clears its bracket.
- Lift and pivot the seat toward the open rear. It exists at an angle, not straight back.
Re-install tip: angle the first pin into its bracket, lower the second pin into place, then press down firmly until you hear or feel the rear hooks engage. The seatback latch should click back into the locked position.
Troubleshooting TJ Stuck Pins
If the seat resists coming free, do not force it straight out. That will jam both pins simultaneously. Instead, partially drop the seat, wiggle it side to side to relieve pressure on the pins, then try tilting again. Patience and angle are your tools here.
Removing the Rear Seat: JK-Specific Steps
The 2-door JK uses a latch and roller system. It’s faster than the TJ in most cases. Some JK builds — especially those modified with aftermarket cargo floors — may have bolted hardware that adds time.
Standard 2-door JK removal:
- Slide front seats fully forward and open the soft-top rear window or tailgate.
- Locate the release bar. On most JK models, it runs horizontally under the front edge of the seat cushion.
- Pull or push the release bar (direction varies by model year) to unlock the base.
- Tip the seat base backward slightly — this releases the front hooks.
- Lift the seat and work it out through the rear opening. It will need some tilting to clear the wheel-well trim.
When Bolts Are Involved
If your JK rear seat has been modified or replaced with a cargo platform system, expect additional fasteners. You may need to:
- Remove front bracket bolts using a 13mm or 18mm socket
- Detach seatbelt anchor hardware — these bolts are torque-sensitive on reinstall
- Disconnect any harness or joiner brackets before attempting to lift
For OEM torque specs and bracket diagrams, consult Jeep’s official rear-seat installation specifications before reinstalling bolted hardware. Over-torquing seatbelt anchors is a common and serious mistake. Also, if you enjoy doing your own Jeep work, check out our guide on how to take Jeep Wrangler doors off for another fast, tool-minimal modification.
Removing the Rear Seat: JL-Specific Steps
The JL is the most user-friendly generation for seat removal. No tools required. The process takes 3–5 minutes once you know the steps.
- Fold the seatback fully forward. It lays flat onto the cushion.
- Reach under the front edge of the seat cushion and locate the horizontal release lever.
- Pull the lever upward. The seat base will tilt or shift forward on its rollers.
- Rotate the seat slightly — usually about 30 degrees — toward the center of the cabin.
- Slide the seat out through the rear opening. The rollers help it move, but you’ll still need to lift the trailing edge over the sill.
A helper makes this much easier. The JL rear seat is the heaviest of the three generations.
For reference, consult the Jeep Wrangler JL owner’s manual for a diagram of the seat bracket locations specific to your trim level.
Re-Installing the JL Back Seat
Align the front bracket pins with the floor receivers first. Lower the seat down until you feel the seat. Then push the rear of the seat down until the lever clicks back into the locked position. Give the seat a firm shake in all directions — it should not move at all. If it wobbles, re-check that the lever has fully engaged.
Re-Installing the Rear Seat: Tips and Checks
Regardless of generation, reinstall follows the reverse of removal. But a few checks are non-negotiable.
- Match pins to brackets exactly. Always angle one side first, then the other. Forcing both pins at once bends brackets.
- Listen for a solid click. A partial latch is dangerous. If it doesn’t click, it isn’t locked.
- Reattach all seatbelt hardware. Pull each belt fully out and let it retract. It should lock when you tug sharply. If it doesn’t retract or lock, something is routed incorrectly.
- Check for rattles before driving. Sit in the rear seat or press down firmly on the cushion. Any movement means the seat isn’t fully secured.
This check takes 60 seconds. It’s worth every second.
Common Mistakes and Safety Tips
These are the errors most commonly made — and the ones most commonly skipped in video tutorials.
- Don’t pull the seat straight backward. Every generation requires pivoting and angling. Straight-out force jams pins and scratches trim.
- Don’t skip the seatbelt check. On JK models with bolted belt anchors, improperly torqued hardware can fail in a collision.
- Don’t remove the rear seat if you regularly carry children. Review the safety guidelines for child passengers in rear seats from NHTSA before making any interior changes that affect rear occupants.
- Don’t load loose heavy cargo right behind your front seats without tie-downs. The D-rings exposed after seat removal are there for exactly this purpose — use them.
- Don’t over-torque bolts on JK reinstall. Use a torque wrench and spec values from your service manual. Seatbelt anchors especially have a required torque value for safety compliance.
Going door-free at the same time? Pair your interior strip-down with the right Jeep Wrangler doors-off mirrors to stay legal and safe on the road.
FAQ: Removing the 2-Door Jeep Wrangler Back Seat
Is it easy to remove the back seat in a 2-door Wrangler?
Yes. Most JL and JK owners finish in 3–5 minutes. TJ owners with the angled pin system may take 5–10 minutes the first time. It gets faster with practice.
Do I need tools to remove the TJ, JK, or JL rear seat?
For JL: no tools at all. For most 2-door JKs: no tools. For TJ: no tools, but the angle-and-tilt technique takes some practice. For JKU or modified JKs with bolted hardware, you’ll need a socket set.
How much does the rear seat weigh in each generation?
TJ rear seats weigh approximately 70–90 lbs, JK seats around 90–110 lbs, and JL seats between 100–120 lbs. Always use a helper for JK and JL seats.
Can I remove just the seatback and leave the seat base?
On most Wranglers, the seatback and base are a single connected assembly. You typically remove the whole unit together. Some aftermarket splits exist, but the OEM seat comes out as one piece.
Does removing the rear seat affect airbags or other safety systems?
On most 2-door Wrangler models, there are no seat-mounted airbags in the rear. Removing the rear seat does not typically affect airbag systems. However, always verify for your specific model year, and consult your owner’s manual if you’re uncertain.
Final Thoughts
Removing the rear seat from your 2-door Jeep Wrangler is one of those modifications that takes minutes but changes how you use the vehicle entirely. Know your generation, follow the correct angle-and-tilt technique, and always verify the latch is fully engaged before driving. If you’re building out a serious adventure rig, consider pairing this mod with the best lift kit for a Jeep Wrangler to complete your capability upgrade from the ground up.