Mini Cooper Motor Swap: The Complete Installation & Planning Guide 2026

A Mini Cooper motor swap transforms an aging or damaged vehicle into a high-performance machine. Whether your factory engine has failed or you’re chasing extra horsepower, swapping a stronger engine into a Mini opens possibilities that stock builds cannot match. This guide walks through everything from initial planning to post-swap tuning, covering engine options, installation steps, legal considerations, and real-world cost breakdowns.
credit: Instagram.com
Is a Motor Swap the Right Move for Your Mini?
Before committing to a swap, assess whether this project aligns with your goals and resources. Motor swaps demand significant time, technical skill, and money—typically $7,000 to $25,000 depending on scope and labor approach. If your Mini has a blown engine and you lack the budget for a full swap, a same-generation replacement engine offers a faster, cheaper alternative. However, if you want genuine performance gains or own a vehicle with a damaged powerplant and the passion to undertake a major project, a swap makes sense.
Consider your mechanical aptitude. DIY builders with engine-swap experience can complete the work in 40 to 60 hours over 2 to 4 weeks. First-timers should expect 80 to 150 hours spread across 2 to 3 months. If outsourcing labor to a professional shop, budgets often reach $15,000 to $25,000 when combining parts and installation fees.
Time investment matters too. A swap isn’t a weekend project—it involves removing the factory engine, fabricating custom mounts, rewiring the engine bay, tuning the computer, and solving unforeseen compatibility issues. If you need reliable daily transportation immediately, delaying until the swap is complete becomes critical planning.
| Preview | Product | |
|---|---|---|
|
EASYBERG 302-1 LS Swap Retrofit Aluminum Oil Pan Retrofit Kit LS1 LS2 LS3 LS6 Rear Sump Pick Up… | Check Price |
Popular Engine Swap Options for Mini Cooper
The K-series Honda engine dominates Mini swap culture, particularly for first-generation (R50/R53) and second-generation (R55/R56) models. Three main options merit consideration.
Honda K20/K24 (K-Swap)
The K-series engine—specifically the K20A2, K20Z3, or K24A2—offers 50 percent more displacement than stock Mini engines combined with tremendous aftermarket support. Naturally aspirated K-series motors produce 200 to 250 horsepower without forced induction. With turbocharging, 350+ horsepower becomes achievable.
Engine sourcing is straightforward: used K-engines cost $1,000 to $2,500 from junkyards or online marketplaces, and specialty kit manufacturers like RPT Creations sell bolt-on conversion packages for $2,500 to $3,500.
The K-swap fits first and second-generation Minis with varying complexity. R50-R53 models (2002-2006) see the broadest K-swap adoption, and RPT offers specific kits retaining the factory radiator and AC systems for R55-R59 models (2007-2013). The appeal: proven reliability, endless tuning options, and a passionate community sharing builds knowledge across forums and YouTube.
BMW N18 Engine (Same-Platform Upgrade)
The N18 sits in Cooper S and Countryman S models, offering a factory-correct upgrade path. An N18 swap avoids the extensive wiring complexity of cross-manufacturer swaps because it uses BMW Mini electronics and fuel delivery systems designed for the chassis.
The downside: N18 engines cost more ($2,500-$4,000 used) and offer less tuning headroom than K-series motors. Power gains cap around 300 horsepower with aggressive tuning, whereas comparable K-swaps hit 350+ more readily.
If you prioritize reliability and minimal rewiring, N18 swaps suit that goal. They’re the “boring” option in the swapping world—straightforward, predictable, lasting. For enthusiasts chasing extreme power or novel builds, K-swaps command attention.
Unconventional Options
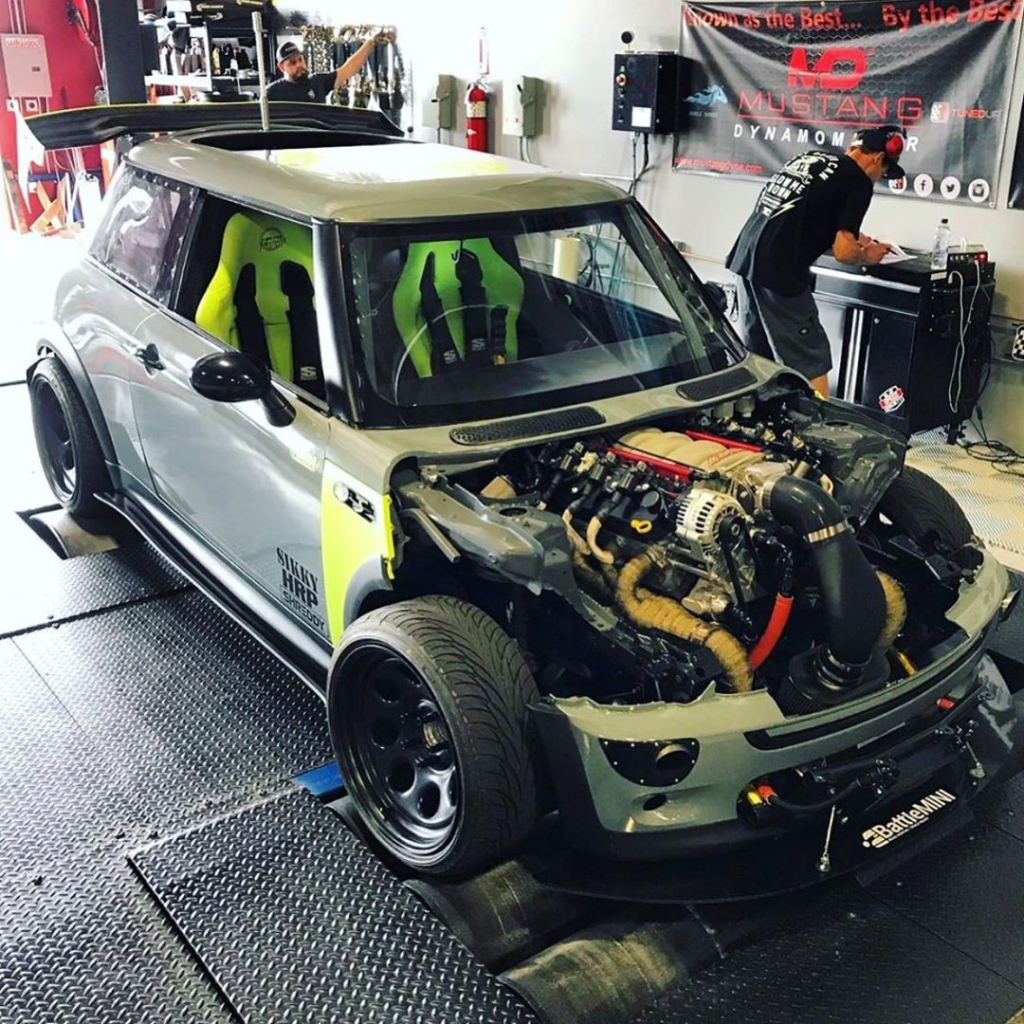
Subaru EJ25 mid-engine swaps, Hayabusa motorcycle powerplants, and LS swaps exist but demand fabrication skills beyond standard swaps. These warrant specialist builder involvement and fall outside beginner territory.
Planning Your Swap: Budget, Timeline & Parts
A structured plan prevents costly mistakes and delays. Start by identifying which generation Mini you own (R50/R53, R55/R59, R56, or F-generation), then source detailed documentation or build threads for that specific model.
Budget Allocation
Breaking down realistic costs:
| Component | Cost Range |
|---|---|
| Engine (junkyard K20/K24) | $1,000–$2,500 |
| K-swap kit (mounts, brackets) | $2,500–$3,500 |
| ECU & wiring adapter | $1,000–$2,000 |
| Fuel system upgrades | $500–$1,500 |
| Cooling system (pump, hoses, radiator) | $500–$1,500 |
| Miscellaneous (bolts, gaskets, sealants) | $300–$500 |
| Parts Total (DIY) | $6,300–$11,500 |
| Professional labor (if outsourced) | $3,000–$8,000+ |
| Total with shop labor | $15,000–$25,000+ |
These figures reflect quality used parts and standard turbo-free builds. Upgraded engines, forced induction, or built internals increase costs dramatically. A high-performance build targeting 400+ horsepower with supporting modifications easily climbs to $20,000 to $30,000 in parts alone.
Parts Sourcing Strategy
Secure the engine and kit first. Facebook Marketplace, Craigslist, and eBay host abundant used K-series engines from salvage yards. Verify low mileage (under 100,000 miles if possible) and request compression tests before purchase to confirm engine health. Reputable kit manufacturers—RPT Creations, Hybrid Racing, and specialized Mini shops—sell complete conversion packages with mounting brackets, oil pans, and wiring solutions tailored to specific Mini generations.
For ECU control, three approaches exist. First, swap the entire factory ECU and wiring harness from the donor engine (simplest but labor-intensive). Second, reprogram your existing Mini ECU to accept the new engine (requires specialist knowledge). Third, install a standalone ECU like Kpro or Haltech (most expensive but offers total tuning freedom).
Source fuel system components early. Many K-swaps use Honda fuel pumps and injectors, requiring custom fuel rail adapters and potentially new regulators if the Mini’s fuel return system differs. Cooling system parts—electric water pumps, custom hoses, radiator adapters—should be identified before installation begins to avoid mid-project delays.
Essential Tools & Equipment
Standard automotive tools form the foundation: socket sets (metric and standard), wrenches, screwdrivers, torque wrenches, and a quality diagnostic scanner. Specialty items matter too.
An engine hoist rated for 600+ pounds lifts the motor safely. Securing an engine stand ($100-200) holds the engine while you prep it outside the bay. A transmission stand or jack dedicated to the gearbox prevents costly transmission damage during removal and installation.
Firewall drilling—necessary for K-swap wiring—requires a drill with hole-saw attachments (1-2 inch bits) to create clean openings for engine harness routing. A multimeter and basic electrical testing equipment identify wiring issues before starting the engine. Engine management tuning may require access to professional dyno equipment if pursuing maximum power, though many builds run reasonably well with plug-and-play ECU solutions.
Step-by-Step Installation Overview
Motor swaps follow a consistent sequence, though specifics vary by generation and engine choice.
Phase 1: Preparation & Safety
Disconnect the negative battery terminal first, eliminating electrical hazards during work. Secure your Mini on jack stands—never rely on a jack alone for extended work. Drain engine oil, coolant, and transmission fluid into clean containers. Remove the hood and engine cover. Document everything visually: take photos of hose routing, wire positions, and fastener locations. Label connectors before disconnection using masking tape and a marker.
Phase 2: Engine Removal
Disconnect fuel injector connectors, ignition coils, alternator wiring, and coolant hoses. Unbolt the AC compressor and power steering pump (if retaining these), and secure them out of the way without disconnecting hoses. Remove the intake manifold and exhaust manifold or header, unbolting from the engine block. Support the transmission with a jack, then unbolt the engine from the transmission (typically 4-6 bolts). Lift the engine carefully out of the bay—this step tests your space planning. Maneuver cautiously around suspension components, radiator support, and subframe points.
Phase 3: New Engine Preparation
Before installation, swap over necessary components from your old engine to the new one: engine mounts (crucial—misaligned mounts cause vibration and failure), oil pan (if your kit requires a specific pan for clearance), power steering pump (if upgrading), and AC compressor (if retaining factory cooling). Replace wear items while the engine is accessible: water pump, thermostat, all seals, gaskets, spark plugs, and timing belt or chain (if original). Use factory-equivalent parts—skimping here creates reliability problems.
Phase 4: Engine Installation
Lower the new engine into the bay, aligning it with the transmission dowels. Position custom engine mounts and hand-thread all bolts loosely before torquing (this prevents cross-threading and misalignment). Some swaps require firewall modifications: cutting small holes for the wiring harness to pass through. Use a grommet and sealed pass-through to prevent water ingress.
Reconnect transmission bolts (torqued to spec—typically 25-40 ft-lbs depending on Mini generation), then install engine mounts fully. Connect all wiring: fuel injectors, coils, temperature sensors, and oil pressure senders. Route the main wiring harness cleanly, avoiding pinch points and heat sources. Reconnect coolant hoses and fuel lines with fresh clamps. Install the radiator, fans, and expansion tank.
Phase 5: Systems Verification & First Start
Fill the engine with fresh oil (check the block for drain plug location—some K-series engines drain differently than stock Mini units). Fill the cooling system, starting the engine briefly to bleed air from the system. Refill as needed. Reconnect the negative battery terminal and prepare for the first start.
Before cranking, verify fuel pressure with a pressure gauge (K-swap Honda systems typically run 35-45 PSI). Confirm spark plug wires or coil connections are secure. If the engine doesn’t start immediately, don’t panic—fuel system priming takes time, especially after sitting. If using a new ECU or harness adapter, verify all wiring is correct before attempting ignition. Many first starts require adjusting fuel trim or idle speed with a laptop tuning program.
Once running, let the engine idle for 2-3 minutes, monitoring temperature gauges and listening for abnormal sounds. Check for leaks around hose connections, fuel lines, and the oil filter. If the engine idles roughly or won’t reach full RPM, this often indicates an immobilizer issue (the car’s security system not recognizing the swap). This requires ECU solution work—either reprogramming, an ECU adapter, or a standalone system.
Critical Technical Challenges You’ll Face
Firewall & Engine Bay Modifications
K-swaps into tight first-generation Minis demand creative engineering. The factory wiring harness cannot pass through existing openings, requiring a 1.5 to 2-inch hole drilled through the firewall. Use a rubber grommet around the pass-through to seal it against the weather. Some builders fabricate custom engine bay panels or remove components (like the power steering reservoir) temporarily to gain room.
Engine Mount Compatibility
Stock Mini engine mounts don’t align with K-series or N18 engines. Custom or aftermarket mounts ($200-800) from kit manufacturers solve this. Incorrect mounts create excessive vibration, damage surrounding components, and feel terrible while driving. If mounting points shift even slightly, verify alignment before final torquing.
Cooling System Stability
K-swaps and higher-output N18 engines generate more heat than stock units, and the Mini’s factory cooling system—designed for lower-displacement motors—struggles. Electric water pumps, larger radiators, or dual-fan setups prevent overheating during sustained driving. Many builders add a secondary electric water pump to circulate coolant while parked, reducing hot-restart problems.
ECU & Immobilizer Wars
This is where swaps either run smoothly or fail miserably. The factory Mini ECU contains an immobilizer code specific to your car’s key fob. A new engine with different electronics confuses the system, preventing startup. Solutions include: (1) reprogramming the new ECU to accept your Mini’s key code (requires specialist equipment), (2) pulling the entire wiring harness and ECU from the donor vehicle (labor-intensive but reliable), or (3) installing a standalone ECU and immobilizer bypass (most expensive but offers tuning flexibility).
Fuel System Integration
K-series engines expect Honda-style fuel return systems—fuel excess pressure returns to the tank, maintaining consistent fuel pressure. Many Minis use returnless systems, which don’t accommodate this. Aftermarket fuel rails, regulators, and pump upgrades bridge this gap. Underfueling causes lean-running, which detonates pistons and destroys engines. Oversizing the fuel pump prevents this risk.
Transmission Compatibility & Cost
Not all transmissions bolt directly to swapped engines. Many builders retain the factory Mini transmission, which works but limits power handling. Upgrading to a Civic Si transmission or other high-strength unit costs $2,000 to $3,500 used, a substantial additional expense. The transmission is often an afterthought in planning, causing project delays.
Post-Swap Tuning & Break-In Procedure
The engine must be broken in properly to develop the ring seal and ensure longevity. Follow the manufacturer’s break-in protocol: varying engine speed (no sustained full throttle), light loading, and an oil change after 500 to 1,000 miles. Many swapped Minis run thicker oil (5W-40 or 0W-40) compared to the original Mini specification—confirm this with your engine supplier.
Professional tuning optimizes fuel and ignition maps for your specific combination of engine, induction method, fuel octane, and turbocharger (if applicable). A dyno tune costs $300 to $800 but prevents running dangerously lean or suffering rev-limiting at low RPM. Even plug-and-play ECU systems benefit from a baseline tune to match your car’s fuel pressure and injector flow characteristics.
Monitor engine parameters closely during the first 100 miles: exhaust gas temperature, knock detection, fuel pressure, coolant temperature, and oil pressure. Address any warning lights immediately.
Legal and Registration Considerations
Engine swaps exist in a gray zone legally. Federal EPA rules state that replacement engines must be from the same year or newer and should have been factory-available for your vehicle model. Some states, particularly California, enforce strict emissions testing through CARB regulations and require “BAR referee” certification for modified vehicles.
If you live in a non-emissions-testing state, registration is often straightforward. However, resale complications arise: prospective buyers may question reliability or demand documentation of the swap’s legality. If you plan to keep the car forever, legal concerns fade; if resale is likely, verify local regulations before committing.
Maintain documentation of all work performed, parts sources, and dyno tuning results. This record demonstrates diligent engineering rather than a hack job, improving the car’s credibility if sold later.
Realistic Power & Performance Gains
A stock K20 produces around 160 horsepower; a K24 generates roughly 190. Inside a Mini weighing 2,500 to 2,700 pounds, these power levels deliver noticeable acceleration and fun factor. With mild tuning (intake, exhaust, ECU reflash), expect 220 to 250 horsepower—a substantial gain over stock N14 (163 hp stock Mini Cooper S).
Turbocharging a K-series engine pushes power beyond 350 horsepower, but requires supporting upgrades: reinforced transmission, upgraded fuel system, better cooling, and chassis bracing. Many daily-driven swaps target 250 to 300 naturally aspirated horsepower for a balance of power, reliability, and longevity.
Expecting 500+ horsepower from a Mini Cooper frame raises durability questions. Chassis, suspension, brakes, and transmission all reach limits. Some extreme builds achieve this but sacrifice reliability and handling predictability.
Maintenance and Long-Term Reliability
Post-swap, monitor fluid levels religiously. Engine oil, transmission fluid, and coolant levels should be checked before every drive during the first 500 miles, then weekly until 2,000 miles. Change oil at 500 miles and again at 2,000 miles to remove break-in debris.
Thermostatic issues persist in many swaps—overheating during city driving or after parking. If this emerges, diagnose cooling system air pockets (bleed the system thoroughly) or confirm the electric water pump functions. A non-functioning pump becomes apparent: the engine heat-soaks immediately when stopped.
Fuel system checks should include verifying fuel pressure under load (sustained acceleration). Pressure dropping below specification signals a weak pump or failing regulator—both compromise power and economy.
Check all connections monthly: engine bay wiring for corrosion, coolant hose clamps for security, fuel line fittings for weeping. Identify small leaks early before they become large failures.
Common Swap Mistakes to Avoid
Don’t skip the firewall or mounting preparation. Rushing into engine installation with improper mounts or electrical routing creates problems felt every mile—vibration, noise, electrical gremlins that take months to diagnose.
Avoid undersizing the fuel system. Running out of fuel at peak RPM is embarrassing and damaging. Upgrades cost little relative to engine damage.
Don’t assume the donor engine is healthy. Compression testing a junkyard engine before installation costs $50 and prevents a dead-on-arrival motor.
Overlook cooling. A seized engine from overheating creates a catastrophic failure. Invest in proven cooling solutions rather than hoping stock systems suffice.
Frequently Asked Questions
How long does a swap take if I do it myself?
With experience: 40-60 hours over 2-4 weeks. First-timers: 80-150 hours over 2-3 months, including problem-solving and research time.
Can I keep the factory AC and heater?
Yes, but it requires additional work. Retrofitting AC compressor and heat core plumbing adds $500 to $1,500 to the budget and complicates the wiring. Many track-focused builds delete these for simplicity.
Will my insurance company cover the swap?
Probably not if the swap causes damage or engine failure during that coverage period. Disclose the modification when renewing coverage and ask about swapped-vehicle policies.
Is the Mini still reliable after a swap?
K-series motors are inherently reliable. The reliability hinges on installation quality, cooling system adequacy, and ECU tuning accuracy. A properly executed swap lasts as long as the original engine—often longer, since K-series mills resist power gains better than stock Mini units.
Do I need to worry about passing emissions testing?
Depends on the location. Non-testing states don’t care. Emissions-testing states require the new engine to be OBD-II compliant (all post-1996 K-series engines are) and often check for visible modifications. California’s BAR referee certification process is more rigorous.
Final Thoughts
The Mini motor swap is achievable for determined builders with mechanical aptitude and patience. Start with detailed research, a realistic budget, and measured expectations. Join community forums, watch build videos, and connect with experienced swappers. These projects reveal the depth of automotive knowledge and deliver genuine satisfaction when a well-planned swap brings a tired car back to life—and beyond.