How to Diagnose and Fix Creaking Sounds When Driving

Hearing creaking sounds while driving typically indicates worn suspension components like bushings, ball joints, or tie rods. Most creaking comes from rubber parts hardening with age or metal components losing lubrication. The good news? These issues are rarely dangerous immediately, but they do require attention within a few weeks to prevent more expensive failures.
Cold weather makes creaking worse because rubber bushings stiffen and bind under load. This seasonal pattern helps with diagnosis—if creaking appears or worsens in winter, suspect rubber components first. You can safely drive short distances while investigating the problem, but prompt repair prevents cascading suspension damage.
Professional inspection offers the most accurate diagnosis, especially if you hear multiple noises or feel handling changes. However, systematic DIY diagnosis can identify the problem component and help you make informed repair decisions. Start with simple tests to locate the source, then narrow down to specific parts before choosing your repair approach.
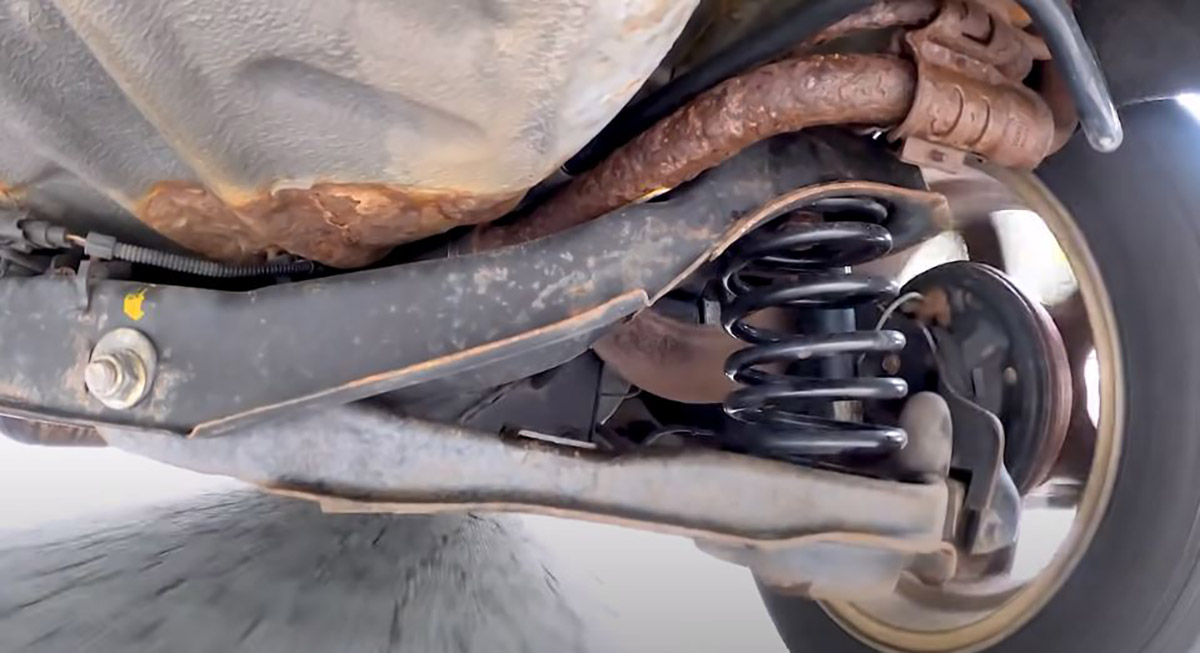
credit: https://blog.1aauto.com/
Step 1: Locate the Source of the Creaking
Start by safely raising your vehicle with jack stands on level ground. Never rely on just a jack for this inspection. Position stands under manufacturer-recommended lift points to ensure stability during testing.
Safety First: Proper Vehicle Lifting
Engage the parking brake and place wheel chocks behind the wheels remaining on the ground. Use a quality floor jack to lift one corner or one end of the vehicle. Position the jack immediately after lifting and lower the jack until the vehicle rests securely on the stands.
Where to Feel for Looseness
Grab each front tire at the 12 and 6 o’clock positions. Pull up and push down with firm pressure. Excessive vertical movement indicates worn ball joints—a critical safety component. Any play here requires immediate attention.
Next, grab the same tire at the 3 and 9 o’clock positions. Push and pull side to side. Horizontal looseness suggests worn tie rod ends or steering linkage problems. Note which side shows more play.
Listen carefully during this testing. The creaking that occurs when you move the wheel by hand points directly to the loose component. The sound should be loudest right at the worn part.
Test each wheel systematically. Don’t assume problems exist on both sides equally. Often, one component fails first due to impact damage or manufacturing variation.
Document your findings by location. Front driver’s side ball joint play differs significantly from rear passenger bushing wear in terms of repair priority and cost.
Step 2: Identify the Most Likely Culprit
Cross-reference your diagnostic findings with common suspension creaking causes to narrow your repair focus.
Sway Bar Bushings: Why They’re the #1 Culprit
Sway bar bushings cause more creaking than any other suspension component. These rubber or polyurethane parts clamp around the sway bar and wear from constant movement. Cold weather hardens rubber bushings, making them bind and creak during turns or over bumps.
You can’t feel sway bar bushing wear directly during the shake-down test. Instead, listen for creaking during slow turns in parking lots or gentle steering inputs while driving. The noise often sounds like it comes from directly beneath your seat.
Worn sway bar bushings rarely affect vehicle safety immediately. However, they can impact handling during emergency maneuvers by allowing excessive body roll.
When It’s Tie Rods vs. Ball Joints
Tie rod ends rank second for creaking frequency. These components connect your steering system to the wheels and wear from constant steering motion. Unlike sway bar bushings, you can feel tie rod wear clearly during the horizontal shake test.
Ball joints carry the vehicle’s weight and allow steering movement simultaneously. Worn ball joints create vertical play during the up-down shake test. They also creak during turns, especially when parking or making tight maneuvers.
Both components can click or creak, but tie rods typically make noise during steering input, while ball joints creak under weight transfer during turns.
Signs Your Struts Are the Problem
Strut assemblies include multiple components that can creak. Worn spring seats or strut mounts create noise during wheel turns while the vehicle is stationary. This differs from ball joint or tie rod creaking, which usually requires vehicle movement.
Place your hand on the spring while someone turns the steering wheel. A feeling of jumping or binding motion indicates worn strut mount bearings or spring seat problems.
Strut problems often accompany other symptoms like poor ride quality, excessive bouncing after bumps, or vehicle nose-diving during braking.
Control arm bushings represent the least common creaking source. These large rubber components typically produce more of a thumping noise than a creaking noise when they wear out.
Step 3: Perform Advanced Diagnostic Tests
Execute specific tests to confirm your suspected component before purchasing parts or scheduling repairs.
The Ball Joint Play Test Explained
Position yourself beside the raised wheel with clear sight lines to the ball joint area. Have someone grab the tire at 12 and 6 o’clock and rock it up and down while you watch for movement in the ball joint itself.
Good ball joints show zero visible movement between the ball joint housing and the component it connects to. Any separation or gap that opens and closes indicates wear requiring replacement.
Listen for clicking or snapping during this test. Sharp metallic sounds suggest severe wear with metal-on-metal contact. Soft creaking indicates earlier-stage wear but still requires attention.
Some ball joints include wear indicators—small grease fittings that protrude when the joint is good and disappear when worn. Check for these visual indicators during your inspection.
Isolating Sway Bar vs. Tie Rod Noise
Drive slowly through a parking lot while making gentle left and right turns. Sway bar bushing creaking occurs during the initial steering input and weight transfer. Tie rod creaking happens throughout the steering motion and may continue as you hold the turn.
Stop the vehicle and turn the steering wheel while stationary. Tie rod wear often produces creaking during this test. Sway bar bushings typically remain quiet without vehicle movement and weight transfer.
Rock the vehicle gently side to side by pushing on the fender. Sway bar bushing problems may creak during this body roll motion. Worn tie rods won’t make noise without steering wheel movement.
Pay attention to creaking frequency. Sway bar bushings often creak once per steering input or bump. Tie rods may creak continuously during steering motion.
Visual inspection helps confirm your diagnosis. Look for cracked, hardened, or obviously deteriorated rubber bushings around the sway bar. Inspect tie rod ends for torn rubber boots or visible corrosion on the ball and socket components.
Step 4: Assess Repair Urgency and Safety
Determine whether your creaking suspension requires immediate attention or can wait for convenient scheduling.
Red Flag Signs: When to Stop Driving
Stop driving immediately if you discover severe ball joint play during testing. Ball joints that show obvious vertical movement between components can separate catastrophically, causing complete loss of control.
Tie rod ends with extreme looseness also warrant immediate attention. If horizontal movement feels excessive and the steering wheel has significant play while driving, seek professional help before continuing.
Other immediate stop signs include obvious separation between suspension components, metal-on-metal grinding noises, or steering that pulls strongly to one side without road crown or wind influence.
Preventive vs. Emergency Repair Timeline
Schedule repairs within two weeks for moderate ball joint or tie rod play. These components wear gradually, but delaying repair risks sudden failure or accelerated tire wear from poor alignment.
Sway bar bushing creaking with stable handling can wait several weeks for convenient scheduling. However, don’t ignore these repairs indefinitely—worn bushings stress other suspension components and reduce emergency handling capabilities.
Strut mount or spring seat creaking rarely creates immediate safety concerns. Plan repairs within a month to prevent noise progression and maintain ride comfort.
Watch for escalating symptoms that change your repair timeline. Uneven tire wear, vehicle pulling, reduced steering responsiveness, or worsening ride quality all suggest progression requiring faster attention.
Monitor creaking frequency and intensity. Occasional creaking during parking lot maneuvers poses less urgency than constant noise during normal driving.
Step 5: Plan Your Repair Approach
Choose between DIY repair, partial professional assistance, or complete professional service based on your skills and available tools.
DIY Suspension Repair: Realistic Skill Requirements
Sway bar bushing replacement represents the most DIY-friendly suspension repair. Most designs use simple bolts and clamps accessible with basic hand tools. No special equipment or post-repair alignment is needed.
Ball joint and tie rod replacement requires intermediate mechanical skills and specialized tools. Ball joint presses or pullers are necessary for proper installation. Tie rod removal needs specific wrenches and careful measurement to maintain approximate alignment settings.
Strut replacement demands advanced skills and spring compression tools. Compressed springs store enormous energy and can cause serious injury if handled incorrectly. Most DIYers should avoid strut work unless highly experienced with suspension systems.
Control arm bushing replacement varies by design. Some bolts in place while others require pressing or even welding. Research your specific vehicle before attempting this repair.
Professional vs. DIY: Cost and Quality Trade-offs
Professional repair includes diagnostic confirmation, proper tools, and post-repair alignment checks. Warranty coverage protects against premature part failure or installation errors.
DIY repairs save labor costs but require tool investment and time. Factor alignment costs into your budget for ball joint or tie rod work—skipping alignment after these repairs causes rapid tire wear.
Professional shops can diagnose multiple problems during inspection. If you suspect several worn components, professional evaluation might cost less than replacing parts individually.
Parts sourcing affects both approaches. OEM parts offer original quality but cost more. Quality aftermarket parts provide good value. Cheap parts often fail prematurely, especially in suspension applications where reliability matters.
Labor rates vary significantly by location and shop type. Dealerships charge premium rates but offer manufacturer training and warranty backing. Independent shops often provide better value with comparable quality.
Consider your time investment realistically. DIY suspension work takes longer than expected, especially for first attempts. Professional repair offers predictable timing for busy schedules.
Tips to Prevent Future Creaking
Adopt maintenance habits that extend suspension component life and delay costly repairs.
Inspect suspension components annually or per manufacturer recommendations. Look for cracked rubber, obvious wear, or leaking grease. Early detection allows planned replacement instead of emergency repairs.
Avoid potholes and rough roads when practical. Impact damage accelerates suspension wear significantly. Slow down for unavoidable road irregularities to reduce stress on components.
Maintain proper tire pressure and wheel alignment. Underinflated tires and misalignment force suspension components to work harder, wearing them prematurely.
Keep vehicle loading within manufacturer limits. Excessive weight stresses suspension beyond design parameters, shortening component life.
Understand seasonal noise patterns. Rubber bushings naturally harden in cold weather, causing temporary creaking that subsides as temperatures warm. However, persistent noise indicates actual wear requiring attention regardless of season.
Modern vehicles rarely benefit from suspension lubrication. Most components use sealed designs or materials that don’t require regular greasing. Adding lubricants to sealed components can attract dirt and accelerate wear.
FAQ: Common Creaking Questions
Is creaking from my suspension dangerous?
Creaking alone doesn’t make your vehicle immediately unsafe for normal driving. However, the underlying component wear can progress to dangerous levels if ignored. Drive cautiously and schedule an inspection within two weeks for most creaking issues.
Can I just lubricate the suspension to stop creaking?
Modern suspension components rarely benefit from added lubrication. Most use sealed designs or self-lubricating materials. Temporary penetrating oil might quiet some noises briefly, but proper repair requires replacing worn parts.
Why does creaking get worse in cold weather?
Rubber suspension bushings stiffen and harden in cold temperatures. This makes them bind more under load, amplifying existing creaking from wear. Noise often decreases in warm weather, but the underlying wear remains and requires repair.
Do I need a wheel alignment after suspension repair?
Yes, wheel alignment is mandatory after replacing tie rods, ball joints, or control arms. These components directly affect wheel positioning. Skipping alignment after these repairs causes rapid tire wear and poor handling.
Can I drive a long distance with a creaking suspension?
Short distances under 100 miles present minimal risk if components aren’t severely loose. Long trips or heavy traffic increase stress on worn parts. Plan repairs before extended driving to avoid roadside failures.
How much does a typical suspension repair cost?
Repair costs vary widely by component and location. Sway bar bushings typically cost $100-250, including labor. Ball joints and tie rods range $150-400 per component. Strut replacement can exceed $400-800, including alignment. Shop around for quotes on your specific vehicle.
Conclusion
Diagnosing creaking suspension sounds requires systematic testing but leads to manageable repairs in most cases. Start with the shake-down test to locate loose components, then use advanced diagnostic techniques to confirm the specific problem.
Most suspension creaking comes from normal wear rather than catastrophic failure. Schedule repairs promptly to prevent more expensive damage, but don’t panic about immediate safety in typical cases.
Professional inspection provides the most accurate diagnosis when multiple problems exist or diagnostic results seem unclear. The modest cost of a professional evaluation often saves money compared to guessing at repairs.
Address suspension creaking within your planned maintenance schedule rather than waiting for emergency situations. This proactive approach maintains vehicle safety and prevents costly cascading failures throughout the suspension system.