How to Fix 2017 Jeep Cherokee Service Shifter Error (Step-by-Step Guide)

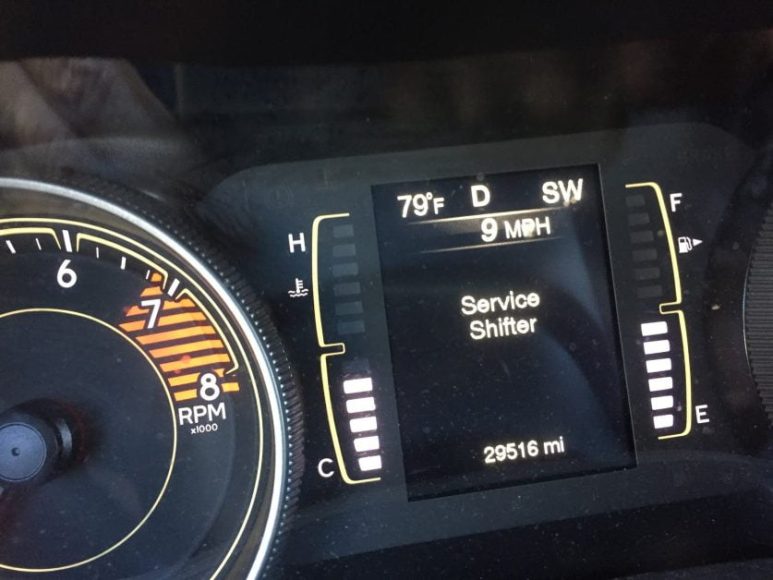
If you’re facing a “Service Shifter” error on your 2017 Jeep Cherokee’s dashboard, you’re not alone. This frustrating issue has affected thousands of Cherokee owners, often leaving them unable to shift out of park or experiencing erratic gear selection. While the problem might seem complex, many cases can be resolved with the right approach and basic tools.
This comprehensive guide provides three proven methods to diagnose and fix your Cherokee’s shifter problems, from simple cable adjustments to complete module replacement. Each method is designed to address different root causes, helping you save hundreds of dollars in dealer repair costs while getting your vehicle back to reliable operation.
Understanding the Service Shifter Error
The “Service Shifter” message on your 2017 Jeep Cherokee indicates a malfunction in the electronic gear selection system. Unlike traditional mechanical shifters, your Cherokee uses a monostable electronic shifter that communicates with the transmission control module to select gears electronically.
Common Error Codes
When the service shifter error appears, your vehicle’s computer typically generates specific diagnostic trouble codes:
- P0705: Transmission Range Sensor Circuit Malfunction
- P0700: Transmission Control System Malfunction
- P0730: Incorrect Gear Ratio
- P0846: Transmission Fluid Pressure Sensor Range/Performance
These codes help identify whether the issue stems from mechanical problems (like cable adjustment), electronic malfunctions (requiring calibration), or component failures (needing replacement).
Symptoms Checklist
Before beginning repairs, confirm you’re experiencing typical service shifter symptoms:
- Dashboard displays “Service Shifter” message
- The shifter feels loose or unresponsive
- Cannot shift out of park position
- The gear indicator shows an incorrect position
- Intermittent shifting problems
- Vehicle stuck in one gear
The 2017 Cherokee was subject to official Jeep service bulletin 08-001-17 addressing shifter calibration issues, with some cases covered under extended warranty. Most failures occur between 40,000 and 80,000 miles, typically triggered by electronic module drift or mechanical wear.
Tools and Materials Needed
Successful shifter repair requires specific tools and materials. Gathering everything beforehand ensures smooth completion without interruptions.
Essential Tools
- OBD2 scanner (capable of Chrysler-specific codes)
- Basic socket set (10mm, 13mm most common)
- Phillips and flathead screwdrivers
- Trim removal tools or plastic pry bars
- Multimeter for electrical testing
- Work gloves and safety glasses
Optional vs. Essential Tools
Essential for all methods: OBD2 scanner ($50-150), basic hand tools ($30-50)
Optional but helpful: Torque wrench for reassembly ($40-80), professional scan tool for advanced calibration ($200+)
Replacement Parts (If Needed)
- Shifter cable: $45-75
- Complete shifter assembly: $200-350
- Shifter module: $150-250
- Transmission range sensor: $80-120
Total DIY cost estimate: $50-400 vs. dealer repair costs of $300-800, providing potential savings of $200-500.
Initial Diagnosis and Safety Preparation
Proper diagnosis prevents unnecessary repairs and ensures you’re addressing the actual problem. Never skip this crucial phase.
Safety Precautions
Park your Cherokee on level ground away from traffic. Engage the parking brake firmly and turn off the engine. If the shifter is stuck in park, you may need to use the manual shift release located near the shifter base.
Critical safety note: Disconnect the negative battery terminal and wait 10 minutes before working near the shifter assembly. This prevents accidental airbag deployment and protects electronic components from power surges.
Reading Error Codes
Connect your OBD2 scanner to the diagnostic port located under the dashboard on the driver’s side. Turn the ignition to “ON” (without starting) and retrieve all stored codes. Document both active and pending codes, as pending codes often reveal intermittent issues.
For a complete list of transmission error codes, reference professional diagnostic databases. Pay special attention to P0705 codes, which directly relate to shifter position sensing.
Visual Inspection Checklist
With the battery disconnected, remove the trim panel around the shifter base using plastic pry tools. Look for:
- Frayed or kinked cables
- Loose electrical connections
- Damaged shifter boot or housing
- Foreign objects interfering with movement
- Signs of fluid leakage
Before proceeding, check for active recalls on your Cherokee using your VIN, as some shifter issues may be covered under manufacturer recalls or extended warranties.
Method 1 – Shifter Cable Adjustment
Cable-related issues account for approximately 40% of Cherokee shifter problems and represent the simplest fix. This method addresses mechanical binding and misalignment.
Cable Inspection
Locate the shifter cable beneath the center console. The cable connects the shifter assembly to the transmission range sensor on the transmission itself. Check the cable housing for kinks, fraying, or damage that could cause binding.
Common failure points:
- Cable attachment at shifter base (wear from repeated use)
- Mid-span routing, where the cable passes through the firewall
- Transmission end where the cable connects tothe range sensor
Adjustment Process
Step 1: With the shifter in park position, locate the cable adjustment point near the transmission. This appears as a threaded rod with locking nuts.
Step 2: Loosen the cable adjustment nuts using a 10mm wrench. Do not remove completely – just break the lock tension.
Step 3: Manually move the transmission range sensor to the park position (fully counter-clockwise). You should feel definite detent positions as you rotate.
Step 4: While holding the transmission sensor in park, gently pull slack from the cable without over-tensioning. The cable should have slight tension but not be tight.
Step 5: Tighten the adjustment nuts to specification (15-20 ft-lbs) while maintaining cable position.
Step 6: Test shifter operation through all positions. Each detent should engage smoothly with the corresponding dashboard display changes.
Testing Cable Adjustment
Reconnect the battery and start the engine. Shift through all gear positions multiple times, verifying that:
- Each position engages positively
- Dashboard gear indicator matches shifter position
- No binding or resistance in movement
- The service shifter message does not reappear
If cable adjustment resolves the issue, proceed to testing and verification. If problems persist, continue to Method 2.
Method 2 – Shifter Module Reset and Calibration
Electronic drift in the shifter control module causes approximately 35% of service shifter errors. This method recalibrates the electronic position sensing without replacing components.
Reset Procedure
The Cherokee’s shifter module requires specific calibration sequences to relearn gear positions. This process clears stored adaptation values and establishes new baseline measurements.
Step 1: Ensure the vehicle is on level ground with the parking brake engaged. The transmission must be at normal operating temperature (drive for 5 minutes before beginning).
Step 2: Turn ignition OFF and connect your OBD2 scanner. Navigate to the transmission control module functions – not all scanners support this advanced feature.
Step 3: Select “Shifter Calibration” or “Range Sensor Learn” from the scanner menu. Follow the scanner’s prompts exactly, as the sequence timing is critical.
Calibration Steps
Manual calibration method (if scanner lacks automatic function):
- Turn ignition ON (engine OFF)
- Move the shifter to park and hold for 5 seconds
- Shift to reverse and hold for 5 seconds
- Continue through neutral, drive, and manual positions
- Return to the park and turn the ignition OFF
- Wait 30 seconds and restart the engine
Professional scanner method:
Follow your scanner’s guided calibration routine, which typically involves moving the shifter to specific positions when prompted. The scanner communicates directly with the transmission control module to record new position values.
Clearing Error Codes
After calibration completion, clear all stored diagnostic codes using your scanner. This prevents old error codes from triggering false warnings. Start the engine and verify that no new codes set immediately.
Test drive the vehicle for at least 10 minutes, cycling through all gear positions multiple times. Monitor for any return of the service shifter message or erratic shifting behavior.
If electronic calibration solves the problem, the repair is complete. Persistent issues indicate hardware failure requiring component replacement (Method 3).
Method 3 – Shifter Assembly Replacement
When cable adjustment and electronic calibration fail to resolve the issue, physical component replacement becomes necessary. This addresses worn shifter mechanisms, failed position sensors, or damaged electronic modules.
When Replacement is Needed
Component replacement is required when:
- Shifter mechanism shows visible damage or excessive wear
- Electronic calibration fails repeatedly
- Multiple error codes persist after other repairs
- Physical binding cannot be resolved through adjustment
Removal Steps
Step 1: Remove all trim panels surrounding the shifter assembly. This typically requires removing the center console, cupholders, and decorative trim pieces.
Step 2: Disconnect all electrical connectors from the shifter assembly. Take photos before disconnection to ensure correct reassembly.
Step 3: Remove the shifter cable connection at the base of the assembly. Mark the cable position for proper reinstallation.
Step 4: Remove the shifter assembly mounting bolts using appropriate sockets. Most assemblies secure with four bolts in a rectangular pattern.
Step 5: Carefully lift the shifter assembly from the console, ensuring no wires snag during removal.
Installation Process
Step 1: Position the new shifter assembly in the console opening, aligning mounting holes carefully.
Step 2: Install mounting bolts finger-tight initially, then torque to proper specifications (typically 15-20 ft-lbs for shifter mounting bolts).
Step 3: Reconnect the shifter cable, ensuring proper engagement and routing. Adjust cable tension as described in Method 1.
Step 4: Connect all electrical harnesses, referencing your disassembly photos for correct placement.
Step 5: Reinstall trim panels and console components in reverse order of removal.
Programming New Module
New shifter assemblies require initialization programming to communicate with your Cherokee’s transmission control module. This process varies by replacement part type:
OEM replacement: Usually requires dealer-level programming using factory scan tools
Aftermarket replacement: May include pre-programmed modules or require professional programming
Attempt the calibration procedure from Method 2 first, as some replacement units accept standard calibration routines. If unsuccessful, professional programming may be necessary.
Testing and Verification
Thorough testing ensures your repair addresses the root problem and prevents recurring failures. Never skip this critical phase.
Comprehensive Testing Protocol
Step 1: Clear all diagnostic codes and verify no immediate code reset occurs with the engine running.
Step 2: Test shifter operation through all positions with the engine off, then repeat with the engine running. Each position should engage positively with the appropriate dashboard indication.
Step 3: Perform a controlled road test, starting in a safe area like an empty parking lot. Test:
- Park to reverse engagement
- Forward gear selection (drive, manual modes)
- Shifting while moving (if equipped with manual mode)
- Hill holding capability
Step 4: Monitor dashboard messages throughout testing. Any return of “Service Shifter” warnings indicates incomplete repair.
Step 5: Re-scan for diagnostic codes after road testing. New codes may indicate related issues requiring attention.
Functionality Checklist
Verify these specific functions operate correctly:
- ✓ Shifter moves smoothly between positions
- ✓ Dashboard gear indicator matches shifter position
- ✓ Engine starts only in park or neutral
- ✓ Backup lights illuminate in reverse
- ✓ No warning messages on dashboard
- ✓ All gear positions engage properly while driving
Document your repair with photos and notes for future reference. Keep receipts for parts and record the mileage when repairs were completed.
Prevention and Maintenance Tips
Preventive maintenance significantly extends shifter system life and prevents costly future repairs. Implement these practices for long-term reliability.
Regular Maintenance Schedule
Every 6 months: Visual inspection of shifter operation and cable routing
Every 12 months: Clean shifter area and check for loose connections
Every 30,000 miles: Professional transmission service including range sensor cleaning
Fluid maintenance: Maintain proper transmission fluid levels and quality, as contaminated fluid can affect electronic sensor operation.
Early Warning Signs
Watch for these indicators of developing shifter problems:
- Intermittent gear indicator flickering
- Occasional resistance when shifting
- Delayed engagement after selecting gears
- Any transmission-related warning lights
Cable lubrication: Apply light machine oil to cable pivot points annually, but avoid over-lubrication, which attracts dirt and debris.
Address minor issues immediately rather than waiting for complete failure. Early intervention often prevents more expensive repairs and reduces the likelihood of being stranded.
When to Seek Professional Help
While many Cherokee owners complete DIY shifter repairs, certain situations require professional assistance to ensure safety and avoid additional damage.
Complex Electrical Issues
Seek professional help when:
- Multiple unrelated error codes appear simultaneously
- The scanner cannot communicate with the transmission control module
- Electrical shorts or burned components are discovered
- Repair attempts result in new problems
Warranty considerations: If your Cherokee remains under warranty, attempting DIY repairs may void coverage for related issues. Contact your dealer to understand warranty implications before beginning work.
Cost-benefit analysis: When professional diagnosis exceeds $150 or multiple repair attempts have failed, dealer service may provide better value despite higher initial costs.
Recurring problems: If the same issue returns within 30 days of repair, underlying causes likely require professional diagnosis and specialized equipment to resolve permanently.
Professional repair becomes economically justified when DIY attempts exceed 8-10 hours of work or require specialized tools costing more than $200. Remember that experienced technicians often complete these repairs in 1-2 hours using factory procedures and programming equipment.
Final Thoughts
Your 2017 Jeep Cherokee’s shifter system, while complex, responds well to systematic diagnosis and appropriate repair methods. By following this guide’s three-method approach, most owners successfully resolve service shifter errors while saving significant money compared to dealer repairs. Always prioritize safety and don’t hesitate to seek professional assistance when repairs exceed your comfort level or available tools.