How to Open a Jeep Key Fob: The Complete DIY Battery Replacement Guide

Your Jeep key fob has stopped responding. You press the buttons, and nothing happens. Instead of paying $120-$400 at a dealership for a replacement, you can fix this yourself in under five minutes. Opening a Jeep key fob and replacing its battery is straightforward—no special tools or technical skills required.
Understanding Your Jeep Key Fob Before You Start
Jeep offers different key fob designs depending on your model year and trim level. Older models (2007-2018) feature traditional remote key fobs with lock, unlock, panic, and trunk release buttons. Newer Jeeps (2018 and later) include smart key fobs with proximity detection and push-to-start functionality. Wrangler JL and JT models, along with newer Gladiators, use a flip-key design with a switchblade mechanism.
The battery type varies by model. Older Jeeps like the Compass, Renegade, Cherokee, and Grand Cherokee typically use a CR2032 battery—a smaller 20mm coin cell with 200-250mAh capacity. Newer Wrangler and Gladiator models require a larger CR2450 battery, which measures 24.5mm and holds 600-700mAh. These batteries are not interchangeable due to size differences and compartment design, so identifying your correct battery type before opening is critical.
Battery lifespan ranges from four to six years for traditional fobs and two to three years for smart keys, though proximity to your vehicle dramatically affects real-world performance. If your key fob remains within 15 feet of your Jeep, the fob continuously communicates with the vehicle, draining the battery in just six to nine months. Storing your fob at a distance or in a Faraday pouch extends battery life significantly.
Identifying the Warning Signs Your Battery Needs Replacement
Before you open your key fob, confirm the battery is the problem. Weak batteries produce distinct symptoms.
Reduced signal range appears first. You might have needed to press your fob from 30 meters away before; now you must stand much closer to unlock the car. Over-clicking becomes necessary—the buttons no longer respond on the first press, and you find yourself pressing them repeatedly. Delayed unlocking creates a lag between button press and door response, sometimes taking several seconds for results.
If your dashboard displays a “Key Fob Battery Low” warning, the vehicle’s system confirms the battery has degraded below optimal voltage. Press the battery’s buttons while holding them against your vehicle’s start button; if this makes the fob work temporarily, a weak battery is almost certainly the culprit.
Gathering Your Tools and Materials
The beauty of Jeep key fob maintenance is the minimal equipment needed. A small flathead screwdriver—the size that fits standard door locks—is your primary tool. If you don’t have one, even a butter knife or an old credit card can work in a pinch. Beyond the screwdriver, you’ll need a replacement battery matching your fob’s specifications (CR2032 or CR2450) and a clean, flat surface to work on.
Optional but helpful additions include a small towel to prevent losing springs that might pop out during disassembly, a magnifying glass if your vision needs support, and a second person to assist if you have a switchblade-style fob with spring mechanisms.
Step-by-Step Process: Opening Your Jeep Key Fob
Remove any keychain attachments. If your fob has a keyring holder or decorative chain attached, detach it now. This prevents the extra weight from shifting your grip while you’re working with the delicate housing.
Locate the seam on the flat side of your fob. Examine your key fob closely. It has two halves—one typically angled and one relatively flat. The seam where these halves meet runs along the perimeter, but you want to focus on the flat side, not the angled edge. A small horizontal groove or channel marks the entry point, usually near where the key attaches or where the keychain hole sits.
Insert your flathead screwdriver into the seam. This step requires care to avoid damaging the plastic housing. Position the screwdriver’s tip into the groove you’ve identified. The screwdriver should fit snugly—not so tightly that you must force it, but not so loosely that it slides out. If it’s too small or too large, find one that creates a secure fit.
Twist the screwdriver gently to break the seal. Rather than prying immediately, apply slight rotational pressure to separate the two halves at that starting point. This initial twist breaks the snap-seal holding the fob together. You’ll feel a slight resistance give way.
Transition to prying upward. After twisting, shift the screwdriver’s angle. Move it slightly to the left and push inward a little. This positions the screwdriver on a small ramp or ledge inside the fob’s design—a feature manufacturers include specifically to prevent damage during opening. Now pry upward gently, lifting the cover rather than pushing down. The downward direction risks damaging the battery compartment.
Continue around the perimeter if needed. If one section doesn’t fully separate, don’t force it. Reposition the screwdriver to another point along the seam and repeat the twist-then-pry motion. Work your way gradually around the fob rather than applying excessive force at one spot. The two halves should eventually separate with satisfying clicks as the internal snaps release.
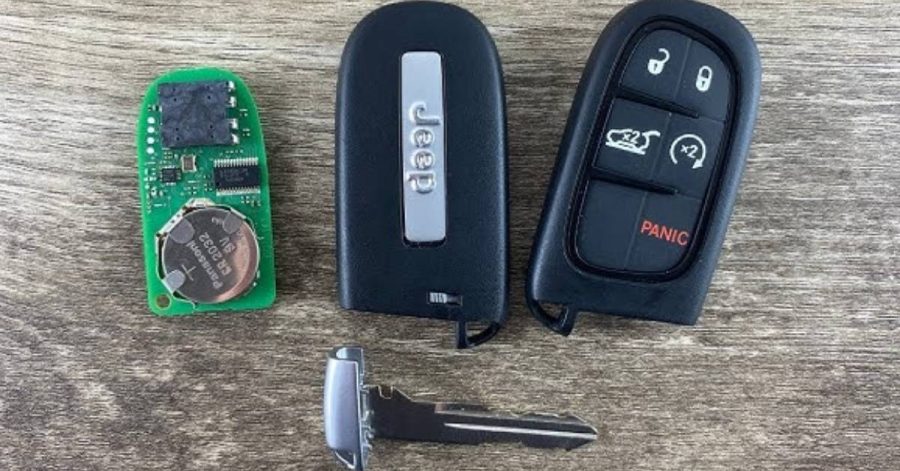
Lift the cover completely. Once you’ve released enough snaps, the cover pulls away from the base, revealing the internal components. Inside, you’ll see the battery sitting in its compartment, often held in place by metal catches or spring mechanisms. You may also notice a thin seal or gasket protecting the electronics—don’t damage this as it aids water resistance.
Removing and Replacing the Battery
Identify your battery’s current condition. Before removing it, note its orientation. The positive (+) side faces upward, and the negative (-) side faces downward. This orientation matters when installing the replacement. If the battery has leaked or shows corrosion (white or green coating on the metal contacts), clean these contacts with a cotton swab lightly dampened with isopropyl alcohol before inserting the new battery.
Remove the old battery carefully. For CR2032 batteries, they typically lift out with gentle upward pressure or a slight nudge from the edge. CR2450 batteries in some models have a small spot above them—using a tiny flathead screwdriver, gently press down in this spot to compress an internal spring, which releases the battery’s tension and allows you to lift it out.
Insert the new battery correctly. Before placing the new battery, verify it matches your fob’s specifications. CR2032 and CR2450 are not interchangeable. Position the battery with its positive side facing upward—the side with the larger, exposed metal disc. Lower it into the compartment and ensure it sits flat and level. If your fob has catches, confirm the battery slides underneath them completely, as improper seating prevents electrical contact and renders the fob non-functional.
Reassembling Your Jeep Key Fob
Align the cover carefully. The cover snaps back onto the base in a specific orientation. Small guides or asymmetrical features prevent incorrect alignment. Position the cover and test that it sits flush without gaps before pressing down. Forcing a misaligned cover risks breaking the snaps or damaging internal components.
Apply steady pressure around the entire perimeter. This is where many people rush. Instead of pressing just the center, gradually work your way around the fob’s edge, applying even pressure. Start at one corner and progress clockwise or counterclockwise, pressing firmly until you hear distinct clicking sounds as each snap engages. The fob will be very tight—this is normal and ensures proper sealing.
Focus pressure on the corners. Certain areas, particularly the corners and where the cover meets the base most tightly, require extra pressure. Don’t be afraid to press firmly; you’re unlikely to damage anything by applying deliberate force. The fob is engineered for this assembly process, and the satisfying snaps indicate successful engagement.
Verify the seal is complete. Once reassembled, examine the fob from all angles. The cover should be flush with the base with no gaps visible. Run your finger around the seam—it should feel smooth and unified, not loose or separated at any point.
What to Do If Your Fob Still Doesn’t Work After Battery Replacement
A new battery doesn’t always immediately solve every problem. If your fob remains unresponsive after replacement, several solutions often resolve the issue.
Resynch your fob with your vehicle. After battery replacement, some Jeeps benefit from reestablishing the connection between the fob and the receiver module. Get inside your vehicle, close all doors, and simultaneously press and hold both the lock and unlock buttons on your fob for five to ten seconds. Then cycle your ignition on and off. This process reinitializes the cryptographic handshake that allows the fob and vehicle to communicate.
Clean the metal contacts. If buttons respond intermittently or certain functions work while others don’t, dirty or corroded contacts may be at fault. Remove the battery again and use a cotton swab lightly dampened with isopropyl alcohol (not water) to gently wipe all metal contact points. Pay special attention to the battery compartment’s metal surfaces and the spring contacts that hold the battery in place. Allow everything to dry completely before reassembling.
Check the button pad condition. Sticky or unresponsive buttons sometimes result from oily residue accumulation on the rubber button pad. If this occurs, remove the circuit board (if you’re comfortable with careful disassembly) and wash the rubber pad in warm soapy water with a soft brush. For the circuit board itself, a brief isopropyl alcohol bath works well—don’t submerge for extended periods, just wipe or briefly dunk, then air dry completely.
Test the fob’s proximity to your vehicle. Store your newly repaired fob at least 15-20 feet from your Jeep for a few hours. Fobs kept in proximity maintain continuous communication with the vehicle, draining batteries much faster than normal. By storing the fob at a distance, you’ll get more accurate real-world battery performance and can troubleshoot whether proximity is contributing to perceived problems.
Verify you purchased the correct battery. Double-check that your replacement battery is the exact type your fob requires. A CR2032 will not fit a CR2450 compartment, and vice versa. Some fobs accept only specific battery brands—Panasonic lithium batteries, for instance, generally perform more reliably than cheaper third-party alternatives.
When to Replace the Entire Key Fob Instead
Sometimes a new battery doesn’t restore the function. If your fob still doesn’t work after cleaning contacts and trying a fresh battery, the internal receiver chip may be damaged. This micro-circuit communicates with your vehicle’s security system and cannot be repaired by battery replacement alone.
Signs the chip is damaged include the fob never working at all after battery replacement, keyless entry failing despite lock and unlock buttons working, or a persistent “Key Fob Not Detected” message on your dashboard, even with a new battery installed.
In these cases, professional replacement becomes necessary. Dealerships charge $120-$400 for OEM replacement fobs, depending on your model. Aftermarket alternatives cost $45-$75 but may lack certain features or require programming at a dealership. Some Jeep owners report dealerships refusing to program aftermarket fobs, so confirm this policy before purchasing.
If you’re stranded with a completely non-functional fob, you can temporarily start your Jeep by holding the physical key fob directly against the push-to-start button and pressing it. The vehicle’s system can detect the fob’s RFID chip through proximity, even with a dead battery.
Preventative Maintenance to Extend Battery Life
Opening your key fob occasionally for maintenance extends battery lifespan and prevents future failures. Every few months, use a cotton swab with rubbing alcohol to gently wipe the exterior of your fob, removing dirt and moisture that can corrode contacts over time.
Store your fob properly when not in use. Don’t leave it sitting in your car within transmitting range—this creates constant communication with your vehicle’s receiver, draining the battery unnecessarily. Keep spare fobs in your home or a Faraday pouch, which blocks radio signals and prevents passive drain.
Cold weather accelerates battery degradation, particularly in regions with harsh winters. Jeep owners in Minnesota and similar climates report battery replacements every six to nine months compared to longer intervals in warmer areas. If you live in a cold climate and your fob battery drains quickly, storing it indoors rather than in a cold vehicle helps preserve charge.
Avoid dropping or water-damage to your fob, as these issues compromise the internal seal that protects components from moisture and contamination. If your fob gets wet, remove the battery immediately, dry all components with compressed air or a cloth, and allow at least 24 hours of air drying before reassembling.
Final Thoughts: Taking Control of Your Maintenance
Opening your Jeep key fob to replace its battery is a five-minute task that saves significant money and inconvenience. By understanding your fob’s specific battery type, following the step-by-step opening and reassembly process, and implementing preventative maintenance, you’ll keep your key fob working reliably for years.
The next time your key fob weakens, you now know exactly what to do. Grab your flathead screwdriver, purchase the correct replacement battery, and handle the repair yourself. Your Jeep doesn’t need to visit a dealership for this simple maintenance task, and you don’t need specialized training or expensive tools.